How to Install a Water Softener Step by Step
Written by: Gene Fitzgerald // Last Updated: Aug 25, 2023
This page may contain affiliate links. If you buy a product or service through such a link we earn a commission at no extra cost to you. Learn more.
If you have hard water in your home a salt-based water softener can protect your plumbing system and household appliances from scaling. However, in order for the softening system to function as intended it needs to be properly installed.
Now, hiring a professional plumber will cost at least an extra couple of hundred dollars.
The good news is that you don’t have to be a plumber to install a water softener as long as you have the right tools and knowledge…
Contents
show
Key Takeaways
- Turn off the water supply.
- Turn off any water heaters.
- Drain the water in all involved lines by opening faucets and other outlets.
- Put your water softener in its desired location making sure it stands level.
- Cut into the main water supply line.
- Install the head valve on top of the softening tank.
- Connect the valve’s inlet/outlet ports to the main water line.
- Connect the softener’s drain valve fitting to a drain using the drain hose.
- Connect a second hose to the brine tank’s overflow valve and route it to the drain.
- Install the brine line.
- Fill salt into brine tank.
- Put softener in bypass, open a nearby cold-water faucet, and slowly turn on the water supply.
- Check for leaks and wait a few minutes to allow air to flush out.
- Open the bypass valve slowly to let water flow into the resin tank. Check for leaks.
- Plug in your new water softener.
- Start a full regeneration cycle.
- Continue with system programming.
Where to Install a Water Softener
First of all, you need to decide where you want to put your water softener. In most cases the best place is in the basement or garage close to where the main water line enters your house.
- For a municipal supply, go downstream of the water meter.
- For a well system, go right after the pressure tank.
FYI: The reason why you want to hook up your softener to the main supply is so that it can provide softened water to the entire house, protecting as much of the plumbing system as possible from mineral clogging. You can branch off a cold water line for untreated drinking water to your kitchen faucet and refrigerator if you want. The same goes for outdoor taps that you use for gardening (soft water kills most plants).
What’s important is that you choose a location that is easy to access with enough space not only to accommodate the system, but also to perform maintenance and repair works.
You also want to consider the following:
- Make sure that the underground is dry and even.
- Placing the softener upstream of the water heater will reduce scale buildup and thus improve heat exchange efficiency for lower energy bills. Having said that, most experts recommend to have at least 10 ft of piping between both appliances to prevent hot water from migrating backwards into the softener during regeneration which could damage the system.
- Remember that the water softener shouldn’t be positioned too far away from a drain for wastewater disposal to rule out air breaks and backflow. You can use a floor drain (preferred), a utility sink, laundry tub, sump, standpipe or another viable option as long as it can handle the extra water load. Ideally, you want to position the unit above and within 20 ft of the drain.
- Modern softeners run on electricity.
- Last but not least, if your house already had a softener installed before, it’s probably best if you place the new one in the same spot as the old.
Soft Water Loop
Many new homes in hard water areas are pre-plumbed with what’s called a “soft water loop”. This is nothing more than a copper line that allows you to connect your home’s inside water distribution pipes to a water softener.
One short section of this copper line, the loop, sticks out from the wall. Thus a softening system can be installed without any additional plumbing required.
The key feature of a soft water loop is that outside hose bibs are separated. This way you don’t waste softened water for irrigation and other outdoor purposes.
Usually, the loop can be found right next to the water heater, typically with a 110-volt outlet and a drain line stub within close range. When installing a water softener the loop is simply removed.
Further Reading:
Plumbing Diagram
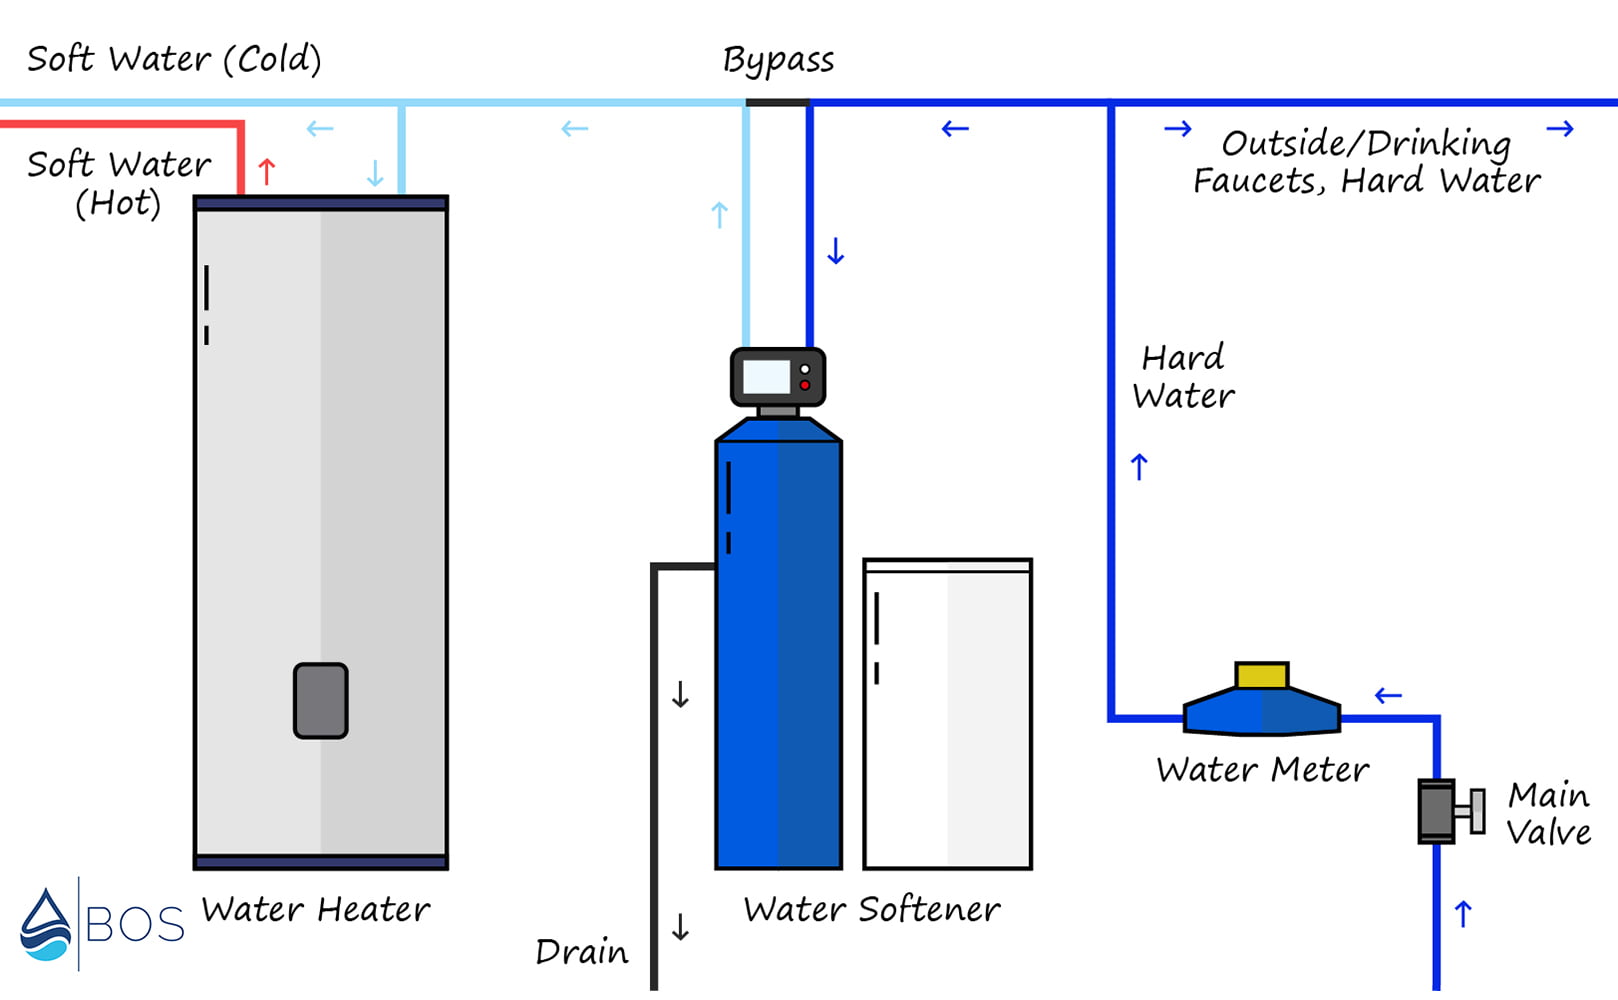
Water Softener Plumbing Diagram
Outside Installation
Manufacturers recommend to NOT put a water softener where temperatures drop below the freezing point, because that could cause problems with the backwash and permanent damage to the system and thus void your warranty.
You should also avoid direct sunlight. Optimal temperature range: 35 to 100° F.
If you have no other choice but to install outside, consider suitable weather protection as needed.
Preparation
Please be aware that some manufacturers require you to hire a licensed plumber to hook up your water softener for you. Otherwise your warranty might void.
For your water softener installation to go as smoothly as possible you should make all the necessary preparations before you start. This includes gathering the following tools and supplies:
- Copper/flexible (PEX) tubing – Depending on the plumbing material you also require:
- Solder and torch
- Pipe cutter
- Drain tubing (+ air gap fitting)
- Plumber’s tape
- Tape measure
- Slip joint pliers
- Different valves, tees, adaptors and fittings
Water Softener Installation Step by Step
Are you ready to get serious? Here is a basic step-by-step outline of how to install a water softener:
The exact steps that you need to take to ensure that your water softener is installed properly can vary from system to system. Therefore, it is mandatory for you to read the instructions provided by the manufacturer. Above that, installation must comply with local plumbing codes.
1. Pre-Installation
- Turn off water supply – You don’t want to cause a major leak in your house so shut off the main water supply first.
- Turn off electric water heater – If you have an electric water heater turn it off for now to protect it from potential damage.
- Drain water in all involved lines – Next, open nearby faucets and other outlets to drain away all remaining water. This little precaution can save you some real money in case anything goes wrong during the setup.
2. Hook Up
- Install brine tank overflow grommet (not for all systems) – Install the brine tank overflow grommet and elbow in the diameter hole at the back of the salt storage tank sidewall.
- Put softener in place – Put the softener in position. Make sure that it stands level.
- Cut into main supply line – Use a pipe cutter to cut into the main line. Use a bucket to catch any water that may come out of the pipe. Sand down the edges.
- Install bypass (not for all systems) – Many softeners come with a built-in bypass valve. But you might still need to install it: Grease the bypass valve O-rings with silicone. Push the bypass valve into the softener valve as far as possible and snap the holding clips into place. If your model does not feature a bypass, we definitely recommend you add one to your setup. It will allow you to easily shut off the water supply to the softener for servicing or reparation without cutting off your entire house as well. In some areas, you are even required by law to install a bypass so that your softener can easily be disconnected in case of emergency.
- Connect inlet/outlet ports – Connect the incoming and outgoing water to your softener’s inlet and outlet port respectively (usually marked somewhere). It is very important that you get the flow direction right. Otherwise your softener won’t be able to provide any soft water. So double-check – this is a very common mistake! For the pipe connections you can either use hard or flexible tubing. The latter requires extra adapters but is much easier to set up and remove. In addition, push fittings save you from soldering. However, if you prefer to solder be careful not to damage any plastic parts – think heat. And don’t forget to seal any threads with plumber’s tape unless otherwise instructed.
- Drain connection – Like we said, salt-based water softeners require a drain connection. Therefore, connect the drain hose to the softener’s drain valve fitting. Use clamps to hold the hose in place. Then route the other end of the drain hose to a drain and secure it. Attention: In most cases, the drain hose must not be pushed directly into the drain to prevent back siphoning of wastewater. An air gap (1½”) is required (check local plumbing codes). You can use an air gap fitting for this. You should precisely follow the instructions provided by the manufacturer here.
- Overflow connection – An overflow connection is an additional safety measure to prevent the brine tank from overflowing. Connect a second hose to the overflow valve and secure it with a clamp. Route the overflow hose to the drain. Secure the hose so it does not whip. Again, keep in mind that an air gap may be required.
- Install brine line (side-by-side softeners only) – The brine line allows a side-by-side system to suck brine from the brine tank into the resin tank. There is no need to install a brine line with cabinet-style softeners.
3. Post-Installation
- Sanitizing (not for all systems) – You might be required to fully sanitize the system before use.
- Fill salt into brine tank – Place the brine well inside the brine tank. Then fill the brine tank with salt (and possibly water). For the right salt type and the optimum amount refer to the manual. With most softeners you have to fill the tank to about two-third. Pro tip: Taping over the brine well before pouring prevents any salt from falling in.
- Put softener in bypass and slowly turn on water supply – Be careful as a sudden increase in pressure can damage your plumbing system. Open a nearby cold water faucet beforehand. Check for leaks. Wait a few minutes to allow air to flush out.
- Partially open bypass valve – Slowly open the bypass valve to let water flow into the resin tank. Air will run down the drain line. Once the noise stops you can fully open the valve. This is also the right moment to turn your electric water heater back on.
- Check everything for leaks – Check all connectors, fittings and valves.
- Plug in – Plug in your new water softener.
- Regenerate – Start a full regeneration cycle.
- System configuration – Again, follow the instructions provided. You have to set the time of the day, your tested water hardness levels and how often you want your softener to regenerate among other things.
Are you ready to install your own water softener? Check out our reviews of the best water softener systems here to get the most value for your money!
YouTube Video Guide
Your installation manual might be inadequate or vague in details. But don’t worry, there are plenty of helpful resources – in addition to this guide – to be found online, such as this YouTube video:
You can follow this link if you want to better understand how a water softener works.
Replacing an Old Softener
Replacing an old water softener is relatively easy. After all, the necessary plumbing is already there.
Before you begin the regular setup process as described above, unplug your old softener and put it into bypass. Then separate it from the plumbing.
Next move the system to a suitable drain and tip it over. Double-check that all water is drained before disposal.
It might also be worth saving the remaining salt that is still in the old brine tank.
Frequently Asked Questions (FAQ)
1. How much does it cost to install a water softener?
The total price depends on a variety of factors. Some customers reported having paid no more than a couple of hundred dollars while others had to pay as much as $1,500 USD and more. Best-case scenario:
Newer homes that have an easy-to-access plumbing loop are the best-case scenario. Here installation costs range between $300 to $500 USD.
For a complete breakdown of water softener installation cost, visit this page.
2. How long does it take to hook up a softener?
It depends on the system itself and other factors like your plumbing skills and the condition of your plumbing system. If you are handy with tools you can install a whole house unit within a couple of hours time.
If you simply want to replace an old softener you can get this done in about an hour or two.
3. How hard is it to plumb a water softener?
That’s a tough question. The best way to find out is to evaluate your initial situation. For example:
Is there a water softener installed in your house already that you only want to replace? If the system is not too old it means that all of the needed plumbing is likely already in place. This makes things a lot easier.
On the other hand, if your house is not pre-plumbed and you have to cut into the main line, install a bypass and cut and solder pipes to appropriate lengths, the whole process might turn out to be too complicated. And in case your home’s main shut-off valve is not fully water tight you may have to call for a plumber anyway.
The most important factor, however, are your basic plumbing skills. Plus, you need the right tools.
The good news is that most manufacturers will gladly help you with any issues for free. You can also contact their customer support to ask for the level of technical expertise that they think is required.
Creating a checklist can also help.
4. Who installs water softeners?
It’s easy to find a professional installer that will help you out. For the best result make sure to hire someone that is licensed, insured and experienced enough to complete the task. Maybe you can ask friends or co-workers for recommendations.
- Retailers – If you purchase your water softener from a retailer like Home Depot or Sears you have the option to book their installation service for an extra fee. This will likely save you a couple of bucks compared to buying system and installation separately. What’s more, the retailer does all the legwork for you and can negotiate the best price within their contractors network. The downside is that it may take up to one or two weeks to get an appointment and there may be inconsistencies in the services provided.
- Local plumbers – Hiring a local plumber guarantees that everything will work as it should. Scheduling an appointment might take a couple of days, though. Asking for estimates from several installers will give you a general idea of the costs to expect.
- Water treatment dealers – A reputable dealer will help you select and install the best softening solution for your home. He will also test your water for hardness, iron, TDS, etc. if that’s required and help you with maintenance and repair works if you want. Bottom line: It’s the most user-friendly option but also the most costly.
If you have any thoughts or questions about how to hook up a water softener please don’t hesitate to leave a comment below!
About the Author Gene Fitzgerald
![]()
![]()
![]()
![]()
![]()
![]()
![]()

Information provided on BOS is for educational purposes only. The products and services we review may not be right for your individual circumstances.
We adhere to strict editorial guidelines. Rest assured, the opinions expressed have not been provided, reviewed, or otherwise endorsed by our partners – they are unbiased, independent, and the author’s alone. Our licensed experts fact-check all content for accuracy. It is accurate as of the date posted and to the best of our knowledge.