How to Install a Reverse Osmosis System Under the Sink
Written by: Gene Fitzgerald // Last Updated: Aug 15, 2023
This page may contain affiliate links. If you buy a product or service through such a link we earn a commission at no extra cost to you. Learn more.
So you have decided to have a go at installing your under sink reverse osmosis system yourself.
Kudos to you! It isn’t terribly complicated if you have a couple of hours and our step-by-step guide.
And hey, if you decide it isn’t for you, then a plumber is also an option, and that’s okay too!
Most importantly, you will be drinking safe, clean water very soon.
Contents
show
Key Takeaways
Here’s how to install a reverse osmosis system under the sink:
- Drill a hole in a flat area of the sink or countertop for the RO faucet.
- Install the drain saddle on the drain line.
- Turn off the cold water supply and run the faucet to release the pressure.
- Remove the tubing from the cold water valve and install the new feed valve—reconnect the tubing.
- Place the storage tank within 10 ft of the RO faucet. Wrap the threaded port at the top with Teflon tape. Screw on the tank valve/connector.
- Mount and connect all tubing.
- Install all the filter elements; pre, post, and the RO membrane.
- Open the feed water valve as well as the RO faucet. Keep the storage tank valve closed. Check the system and connections for leaks.
- Allow the system to flush out debris and sediment from the new parts.
- Close the RO faucet, and then open the storage tank valve.
- Allow the tank to fill, then drain. Repeat this step up to three times.
Under Sink Reverse Osmosis System Installation Diagram
A visual aid so you can see how all the different components in the system fit together.
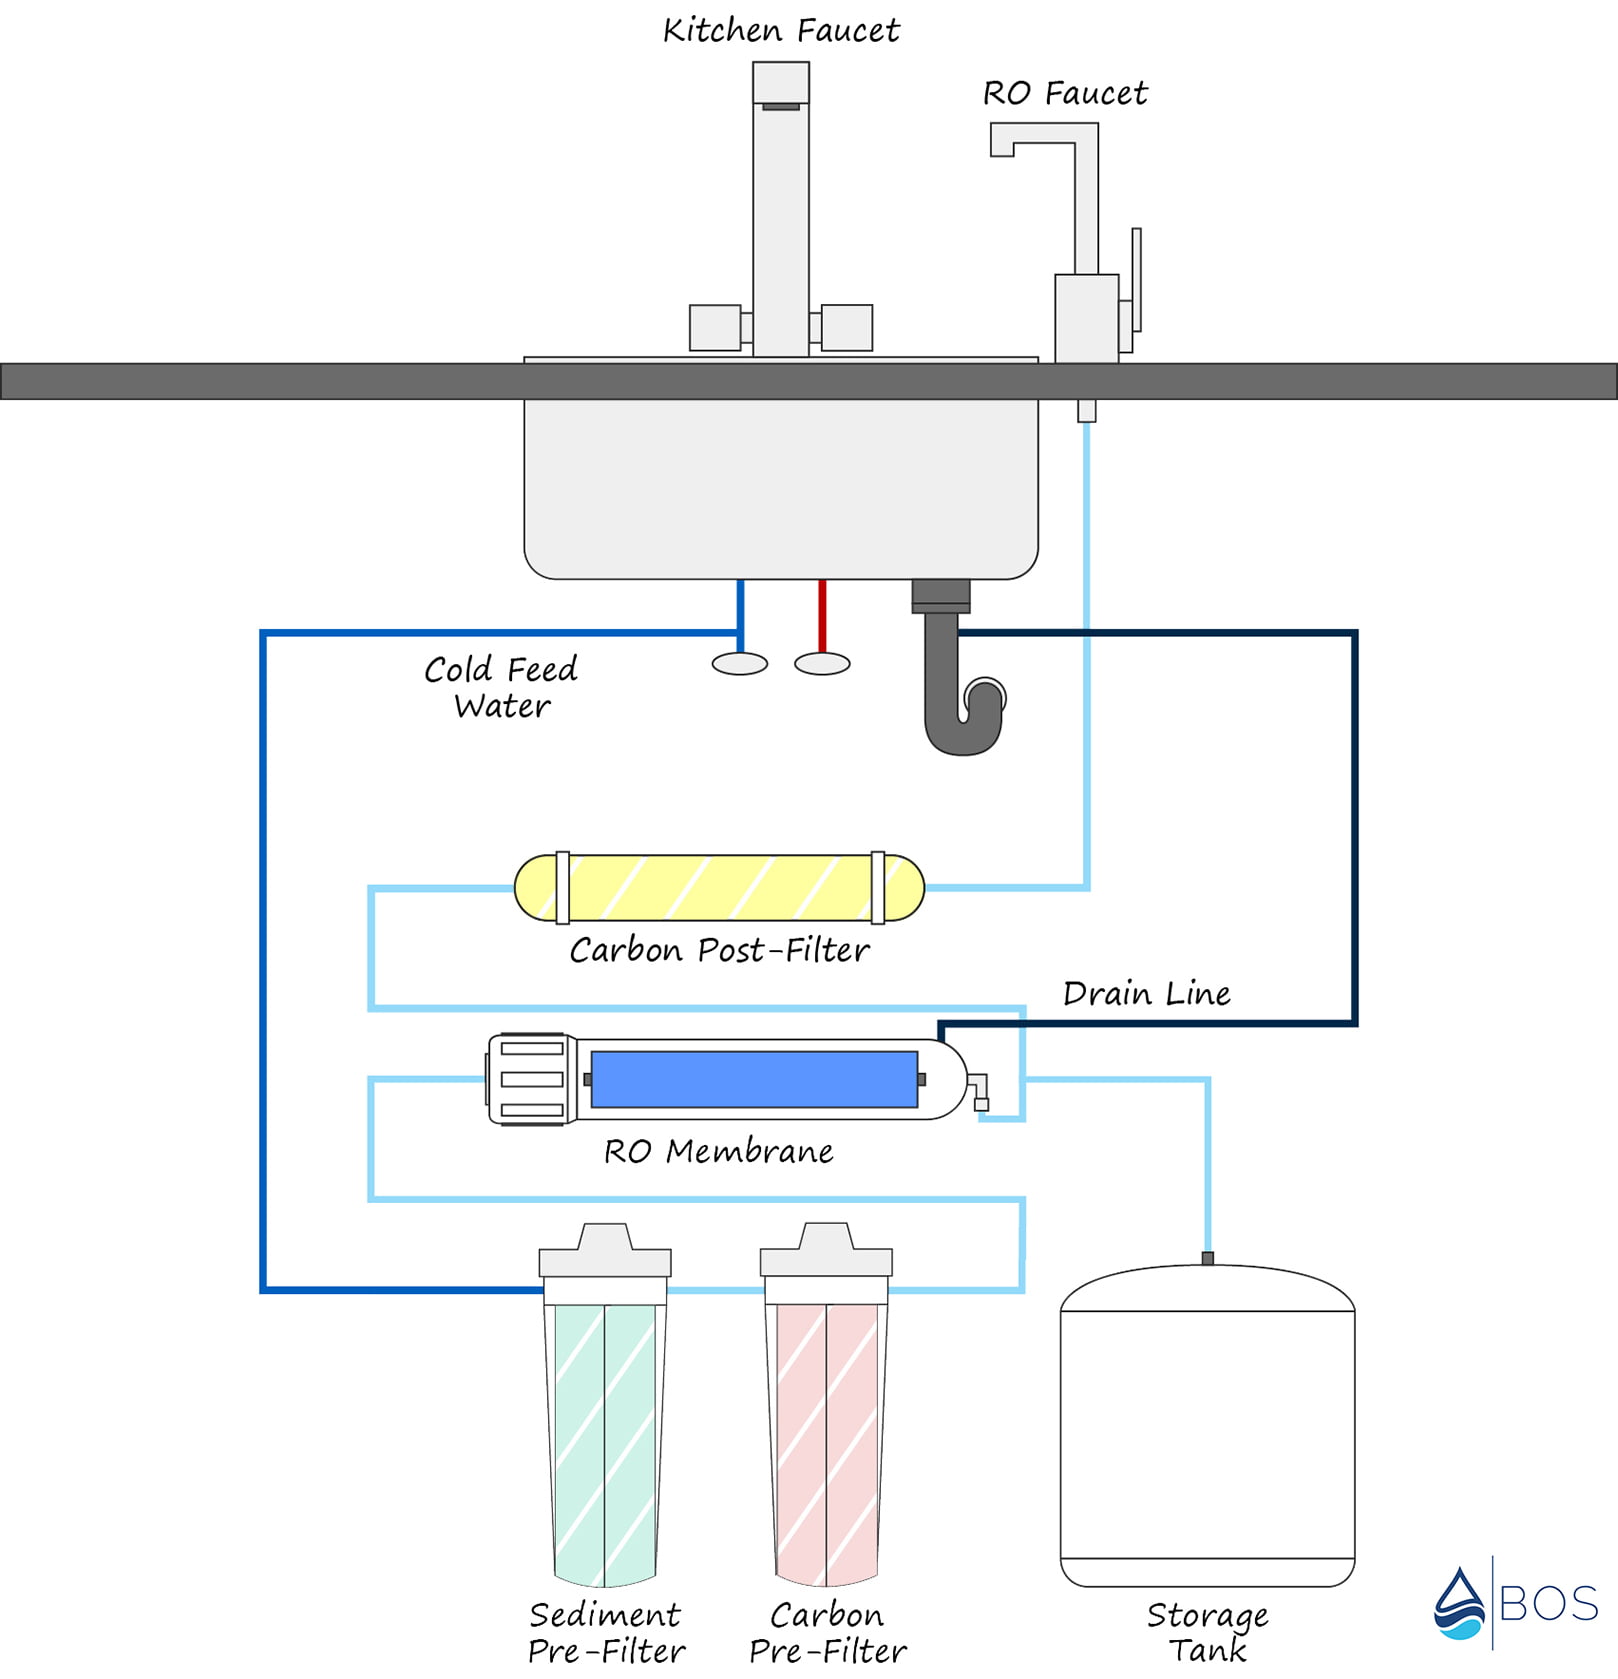
How to Install a Reverse Osmosis System Under the Sink
So, let’s go through how to install a reverse osmosis system under the sink.
The most important thing to start with is making sure the system is actually going to fit under your sink. If not, then you will have to look at another area to put it in, which could make the process a little more complicated.
Location: Where to Install the…
RO Unit
Usually, the units are installed under the kitchen sink. If there is not enough room, it could be installed in a garage, basement, or utility room, and then you could run a water line to the kitchen sink. This may require a delivery pump, though.
Besides, under sink reverse osmosis systems must be installed away from freezing temperatures, on a cold water line, and downstream from any other water treatment or softening system.
Faucet
Check the chrome plate on your kitchen sink to see if there is an extra hole. If there is not, you will need to drill one. When doing this, ensure the surface is flat and that you will be positioning the faucet so that it is not in the way or in an inconvenient spot.
Water Storage Tank
The storage tank should be placed within 10 feet of the RO faucet in a convenient location. They can be placed on their sides or standing upright.
Drain Saddle
This connects the RO system’s drain line with your drain. Drain clamps fit standard-sized drainpipes (1-1/2″). Make sure to install above the P-trap, either vertically or horizontally (top or side of pipe), and away from any garbage disposal to avoid clogging the drain line.
Further Reading:
Preparation: Equipment and Supplies You’ll Need
Figure out where you want to position your RO system. Is there enough room under the sink for the filter module and a tank? If not, plan for it to go elsewhere.
Make sure a cold water line is available for your feed water.
Unbox the system and check that everything will fit in the chosen location.
Tools and equipment you will need include (and may not be limited to):
- RO system installation manual
- RO module
- Water storage tank
- Faucet
- Filter cartridges + RO membrane
- Filter housings
- Installation kit usually contains the color-coded tubing, wrench, stop connector, tank valves, faucet connector, and drain saddle
- Power drill
- A ¼” (⅜”) (½”) drill bit (size depends on faucet type used)
- A screwdriver
- Tubing cutter
- A utility knife
- Adjustable wrench
- A towel
1. Faucet Mounting Instructions
Depending on the material, you may need a particular type of drill to prevent scratching. For drilling, you need 2 inches of a flat surface, not thicker than 1 ¼ inches. Check to make sure you are not drilling through and into anything important.
Procedure for Stainless Steel Sinks
- Mark the spot with a center punch and grind away enough surface material to accommodate the ¼” drill bit.
- Carefully drill the hole. For a ⅜ inch or ½ inch hole, drill a ¼ inch pilot hole first.
- Remove any remaining metal chips and clean up sharp edges.
- Put the faucet through the hole and secure it with washers and a hex nut.
- Attach the quick connect fitting and tighten it with a wrench, and voila! All done.
Porcelain, Ceramic, Enamel, Cast Iron, and Other Sink/Countertop Materials
- Slowly drill a 1/4″ pilot hole with a masonry pit if you go through porcelain. Choose other drill bit type for other sink materials.
- Stop when you hit metal.
- Switch to a metal cutting bit and continue.
- Enlarge the pilot hole to ½ inch in diameter with larger masonry & metal cutting bits.
2. Installing the Drain Saddle
Also known as the drain line adapter. It needs to be as far away as you can get it from the dishwasher discharge and garbage disposal and should be at least 6 inches above the P-trap.
- Drill a ¼” hole in the drain line’s top or side (not the bottom). Align the clamp hole with the hole in the pipe and secure it with bolts. Do not over-tighten.
3. Feed Water Valve
This valve connects the RO system to the cold water line.
- Turn off the cold water supply.
- Release the water line pressure by turning on the faucets and running them out.
- Remove the tubing from the cold water valve.
- Install the feed valve and tighten it with a wrench.
- Close the feed valve for the time being.
- Connect the cold water tubing to the valve (an adapter might be required) and turn the water supply back on.
4. Water Storage Tank Installation
It is best to place the storage tank within 10 feet of the RO faucet, so you don’t lose water pressure. The tank can be pretty heavy when full, so make sure to have it on a surface that can handle the weight.
- Before installing, wrap Teflon tape around the threaded port at the top.
- Hand screw on the tank valve or tank connector. They do not need to be tightened.

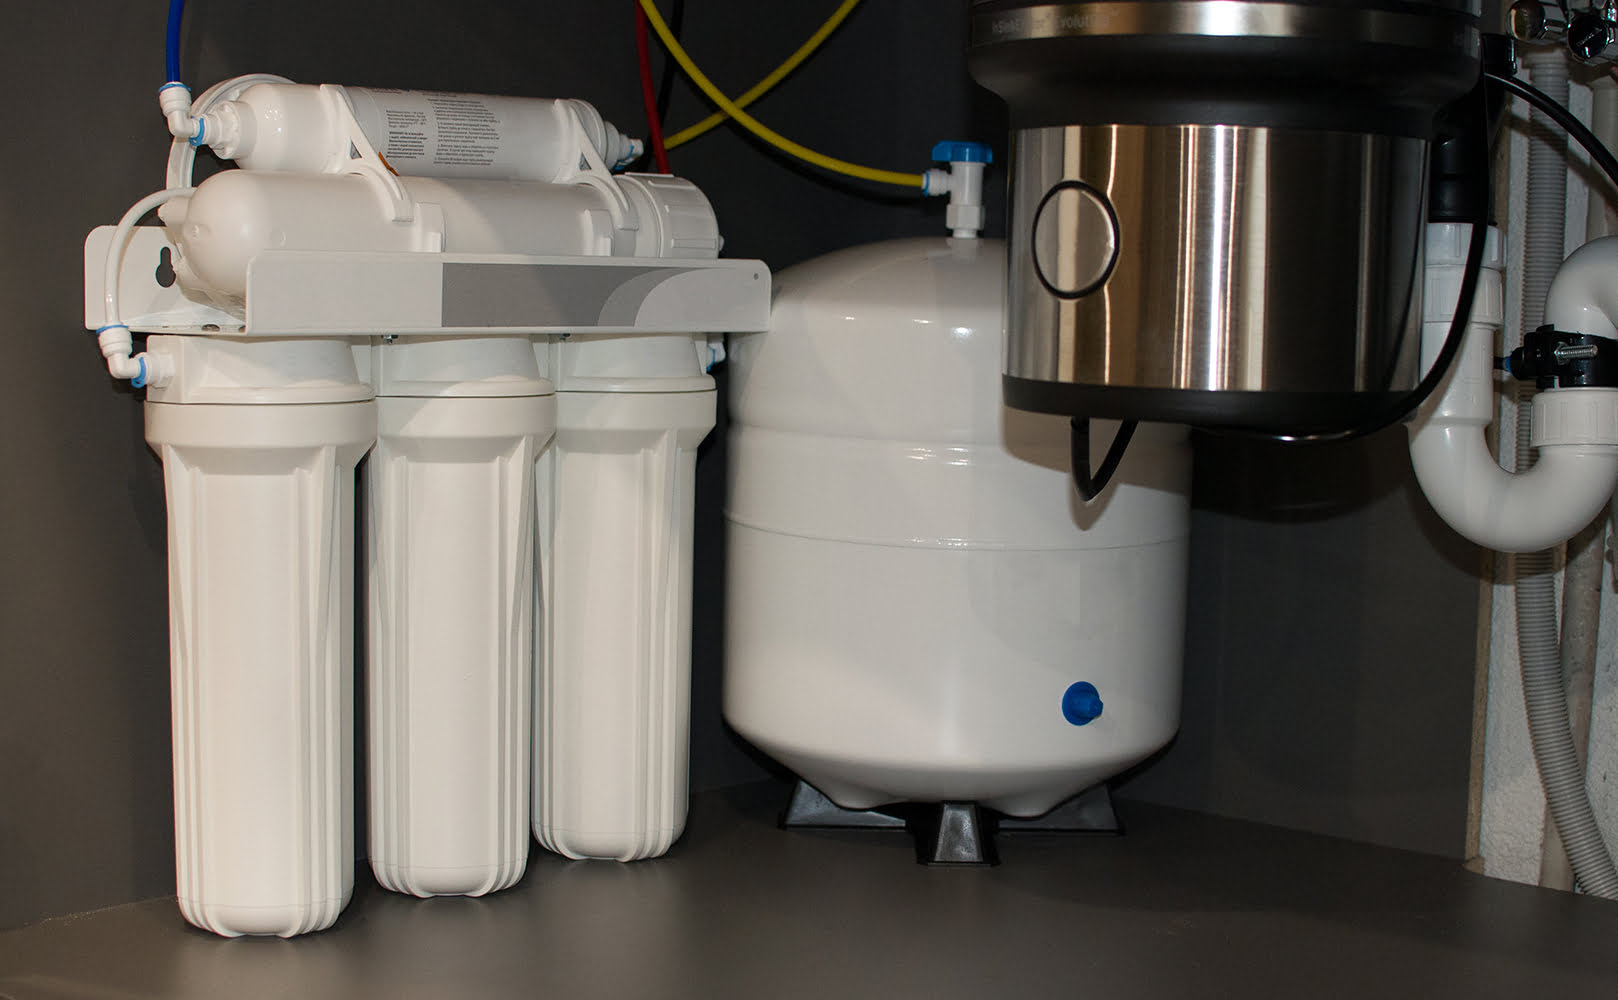
5. Mounting the RO Module
If you are mounting your RO module, be sure to allow enough space underneath the system to be able to maneuver when replacing filters.
6. Connecting the Tubing
The tubing in most RO systems is color coded. Simply push the tubes into their fittings as far as you can. Pull back gently to see if it has adequately connected. Keep a towel handy, as water sometimes remains in the tubes from testing.
While cutting the lines if they are too long will mean maximizing your water flow, if you plan to move the system in the future, you might need the extra line length.
- Push the supply line onto the installed feed water valve on one end (tighten the nut a half turn past what you can manage with your hands). Connect the other end to the feed port of the RO unit. If the line kinks, it can be cut.
- Attach another line to the tank valve and the filter system’s outlet port.
- One line connects the drain saddle to the RO module’s flow restrictor. Cut the line so the water can flow down without loops or kinks.
- Connect the final line with the quick connect fitting of the RO faucet and also to the post-filter outlet port.
7. Filters + Membrane Installation
- Remove the pre-filter housings, insert the filters, check all the O-rings are in place, screw the housings back on, and tighten them up with the filter wrench.
- Remove the housing cap for the RO membrane and gently push the cylinder into the socket until it is all the way in. Screw the lid back on and make sure that the O-rings are tightly in place.
8. Starting the System + Flushing
- Turn on the feed water and the RO faucet, but close the valve to the storage tank.
- Check all connections for leaks.
- After about 10 to 15 minutes, a little water will start to come out of the RO water dispenser. The water may be discolored from some of the carbon being flushed out.
- Close the faucet and then open the storage tank valve to allow the tank to fill up. This could take anywhere from 3 to 10 hours.
- Open the drinking water faucet and flush the whole unit as soon as it’s full.
- Let the tank refill, and then flush a second time.
- Depending on the manufacturer’s instructions, you may also need to do this a third time before your water is ready to drink.
Installation Video
For all you visual learners out there, here is a handy video to show you what we have outlined above.
Can I Connect an Under Sink RO System to My Ice Maker/Refrigerator?
You can absolutely connect your under sink RO system to an ice maker, refrigerator, or even coffee machine. You may need a pump if you are going to do this to help with the water pressure.
Hiring a Professional Plumber
This is always an option for people who don’t want the hassle of figuring out how to install an under sink reverse osmosis system themselves. A professional plumber should be able to get the job done in a relatively short space of time, and it could cost anywhere from $150 to $400. There are a few things to consider when hiring a plumber for the job, though:
What to Look Out for
Check reviews online for local plumbers in your area. Some helpful websites are:
- Angie’s List
- Yelp
- HomeAdvisor
- Google Reviews
Once you have a shortlist, call to ask questions and get a ballpark estimate for the cost. Some of the questions to ask are:
- Are you familiar with RO installations?
- How long does a typical RO installation take?
- What is your hourly rate?
- Do you have any references?
What Is an Under Sink Reverse Osmosis System and How Does It Work?
An under sink reverse osmosis system typically sits under your kitchen sink, filtering the water that comes through it. This is also known as a point-of-use system. It works the same way as any other RO system, using water pressure to push the feed water through a very fine membrane, which leaves contaminants on one side to be disposed of, and allows purified water through to the other.
Under sink RO systems have other filtration steps as well; typically a sediment filter and two carbon filters to remove chemicals, improve the water’s taste, and protect the RO membrane from damage.
Why Even Install an Under Sink RO System?
RO filtration systems are one of the best ways to filter almost everything out of your water to ensure you and your family drink clean, contaminant-free H2O.
An under sink reverse osmosis system is ideal for people who do not have the counter space for a countertop unit.
If you have any questions about installing reverse osmosis under the sink please don’t hesitate to leave a comment below!
About the Author Gene Fitzgerald
![]()
![]()
![]()
![]()
![]()
![]()
![]()

Information provided on BOS is for educational purposes only. The products and services we review may not be right for your individual circumstances.
We adhere to strict editorial guidelines. Rest assured, the opinions expressed have not been provided, reviewed, or otherwise endorsed by our partners – they are unbiased, independent, and the author’s alone. Our licensed experts fact-check all content for accuracy. It is accurate as of the date posted and to the best of our knowledge.