Under Sink RO System Diagram | Everything at a Glance!
Written by: Gene Fitzgerald // Last Updated: Aug 15, 2023
This page may contain affiliate links. If you buy a product or service through such a link we earn a commission at no extra cost to you. Learn more.
Reverse osmosis is a great way to ensure you have access to clean drinking water for yourself and your family.
This article features an under sink reverse osmosis system diagram, explaining how such a system works with its various components.
It will help you understand the basics of under sink reverse osmosis and allow you to decide if this is the right water treatment solution for you. Let’s begin!
Contents
show
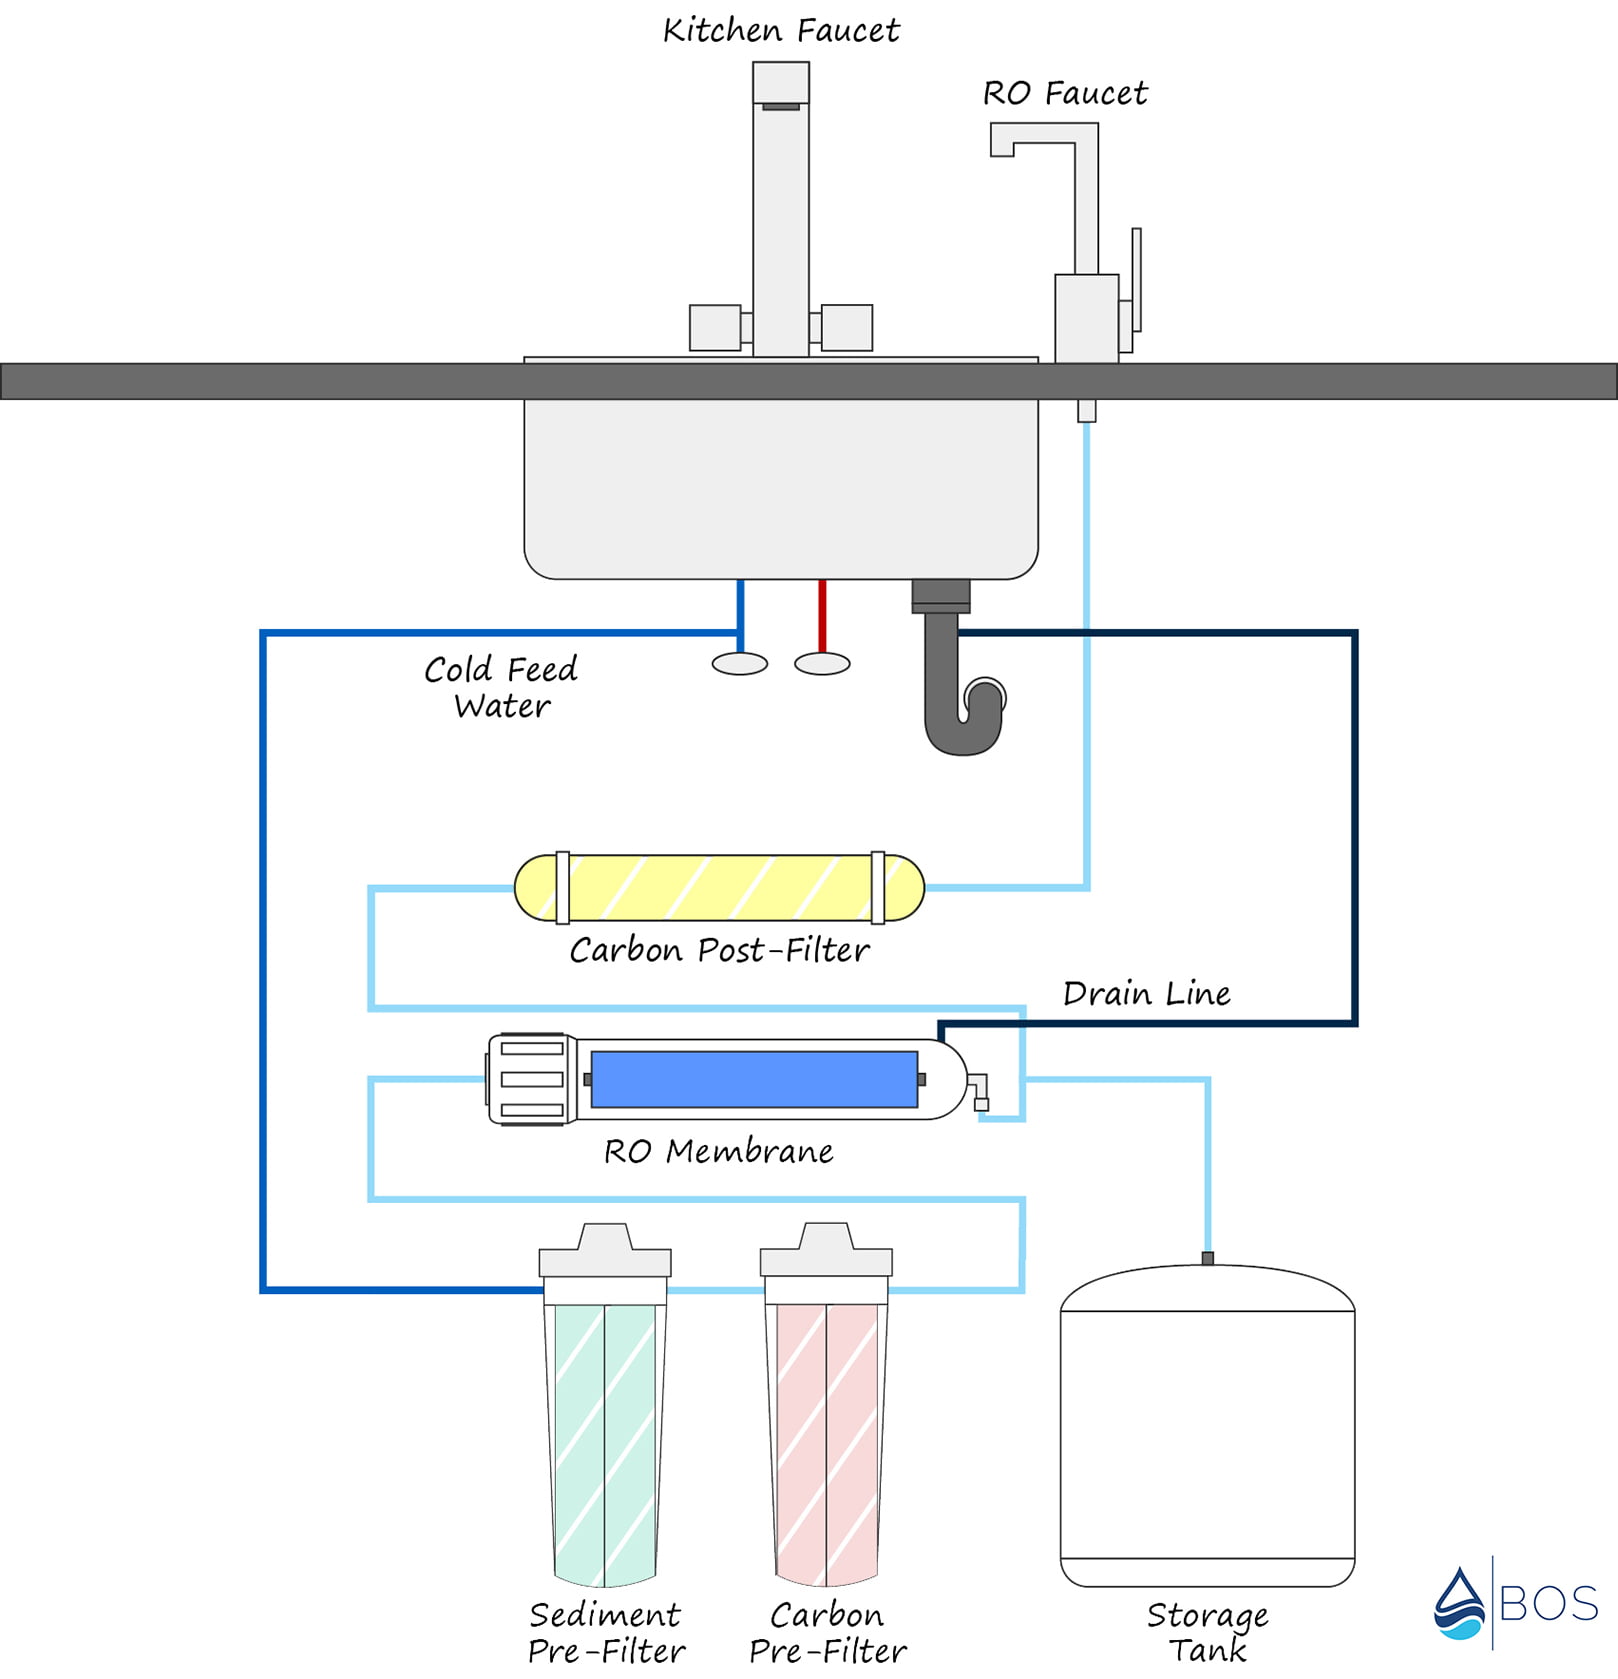
Under Sink Reverse Osmosis System Diagram
Under Sink Reverse Osmosis System Components
The main components of an under sink RO filtration system are the pre and post-filters, the RO membrane, and the sizeable storage tank. Often a bracket is provided should you wish to mount the unit.
Under Sink System Module
The system module connects all the different components which make up an under sink reverse osmosis filter system.
It’s usually a single piece of molded plastic with an input and output port and threads to screw on the various filter stages.
Pre-Filters
Before the unfiltered water gets to the reverse osmosis membrane, it will pass through a sediment pre-filter and a carbon pre-filter.
- The sediment one removes floating particulate from the water.
- The carbon filter removes chlorine and various chemicals among other contaminants.
Both are necessary as too much particulate matter can cause the RO membrane to clog, and chlorine can damage the RO membrane making it more porous.
Reverse Osmosis Membrane
This membrane has tiny pores that stop most contaminants from passing through into the purified water. It rejects a wide variety of impurities, which leave the system down the drain line.
Post-Filter
After leaving the storage tank, the purified water passes through a post-filter, designed to remove the last of the impurities and eliminate any strange tastes or smells the water may have picked up while in the storage tank.
Water Storage Tank
RO filtration can be slow, and the storage tank ensures you always have some RO water stored and ready to use. After the water moves through the RO membrane, it ends up in this pressurized tank, ready to be sent out the minute the faucet is opened.
RO Faucet
The RO faucet is not the same as your main faucet; it is separate. This means you can still use unfiltered water for washing dishes.
Drain Line with Drain Saddle
The drain line is there to dispose of the wastewater and contaminants produced by the filtration process.
Feed Valve
The feed water valve connects the system with your cold water supply line under your sink. Unfiltered water will come through this valve before reaching the RO unit to begin the filtration.
ASO
The auto shut-off valve stops the system from constantly filtering. When the storage tank is full, it is triggered to shut the valve, so no more water flows through to the RO membrane.
The valve is deactivated once you use the faucet and the pressure in the RO tank drops.
Check Valve
This valve blocks the flow of water coming back from the storage tank toward the RO membrane (avoids damaging).
Flow Restrictor
This element restricts the flow and production of wastewater and maintains a high enough pressure for the water to push through the RO membrane.
Tubing
Tubing is what connects all the components of the RO system.
Fittings
Quick-connect fittings attach the tubing connections to the RO components. These are usually color coded so you can quickly tell which tube connects to which part.
Where to Install the Various Components

System Module
These modules are usually mounted under the kitchen sink but can be installed in a utility room or basement if there is not enough space. Just make sure it is not anywhere that gets freezing, as it can freeze over.
Tank
The storage tank must be within 10 feet of the RO faucet. They can either lay on their sides or stand upright. They can get pretty heavy when full, so make sure whatever is holding it up is strong enough.
Faucet
When positioning the faucet, make sure it is on a flat surface. The chrome plate on your sink may have an extra hole drilled; if not, you will have to drill one.
Drain Saddle
The drain saddle valve should be installed above the P-trap, on the vertical or horizontal tailpiece, and not near the garbage disposal or washing machine lines to avoid clogging.
Further Reading:
How to Install
Installation is a relatively simple process if you have the right tools and a spare few hours. If not, you can always call a reputable plumber to do it for you!
Preparation (Tools)
- A ⅜ inch variable speed electric drill; (2,500 RPM is best for stainless steel)
- ⅛ inch, ¼ inch & ½ inch metal cutting drill bits
- ⅛ inch, ¼ inch & ½ inch concrete drill bits (for porcelain sinks)
- Phillips head screwdriver
- 6-inch adjustable wrench
- Teflon tape and a plastic tubing cutter
- Hammer and center punch
Step by Step Instructions
- Faucet – Drill a hole into a flat area of your countertop or sink.
- Drain saddle – Install on the sink drain line, as far away as possible from the dishwasher and garbage disposal.
- Feed valve – Turn off the water supply beneath your sink. Release pressure by opening the faucet. Remove the tubing from the cold water valve and install the new feed valve. Reconnect the tubing.
- Storage tank – Wrap the threaded port at the top with Teflon tape and then screw on the tank valve/connector.
- RO module – Mount and connect the color-coded tubing to the feed water valve, tank valve, drain saddle, and RO faucet.
- Install the filters and membranes.
- Open the feed water valve and check all connections for leaks.
- Allow the system to flush out any debris.
- Close the RO faucet and open the storage tank valve.
- Allow the tank to fill, then drain. Repeat this step.
If you have any questions about our under sink RO system diagram please don’t hesitate to leave a comment below!
About the Author Gene Fitzgerald
![]()
![]()
![]()
![]()
![]()
![]()
![]()

Information provided on BOS is for educational purposes only. The products and services we review may not be right for your individual circumstances.
We adhere to strict editorial guidelines. Rest assured, the opinions expressed have not been provided, reviewed, or otherwise endorsed by our partners – they are unbiased, independent, and the author’s alone. Our licensed experts fact-check all content for accuracy. It is accurate as of the date posted and to the best of our knowledge.