Reverse Osmosis System Installation Diagram | All At a Glance!
Written by: Alexandra Uta // Last Updated: Aug 15, 2023
This page may contain affiliate links. If you buy a product or service through such a link we earn a commission at no extra cost to you. Learn more.
Are you about to install a reverse osmosis system?
Not exactly sure how that goes?
Find our reverse osmosis system installation diagram below. It will help you understand the connection process and also outlines how such a system operates.
Contents
show
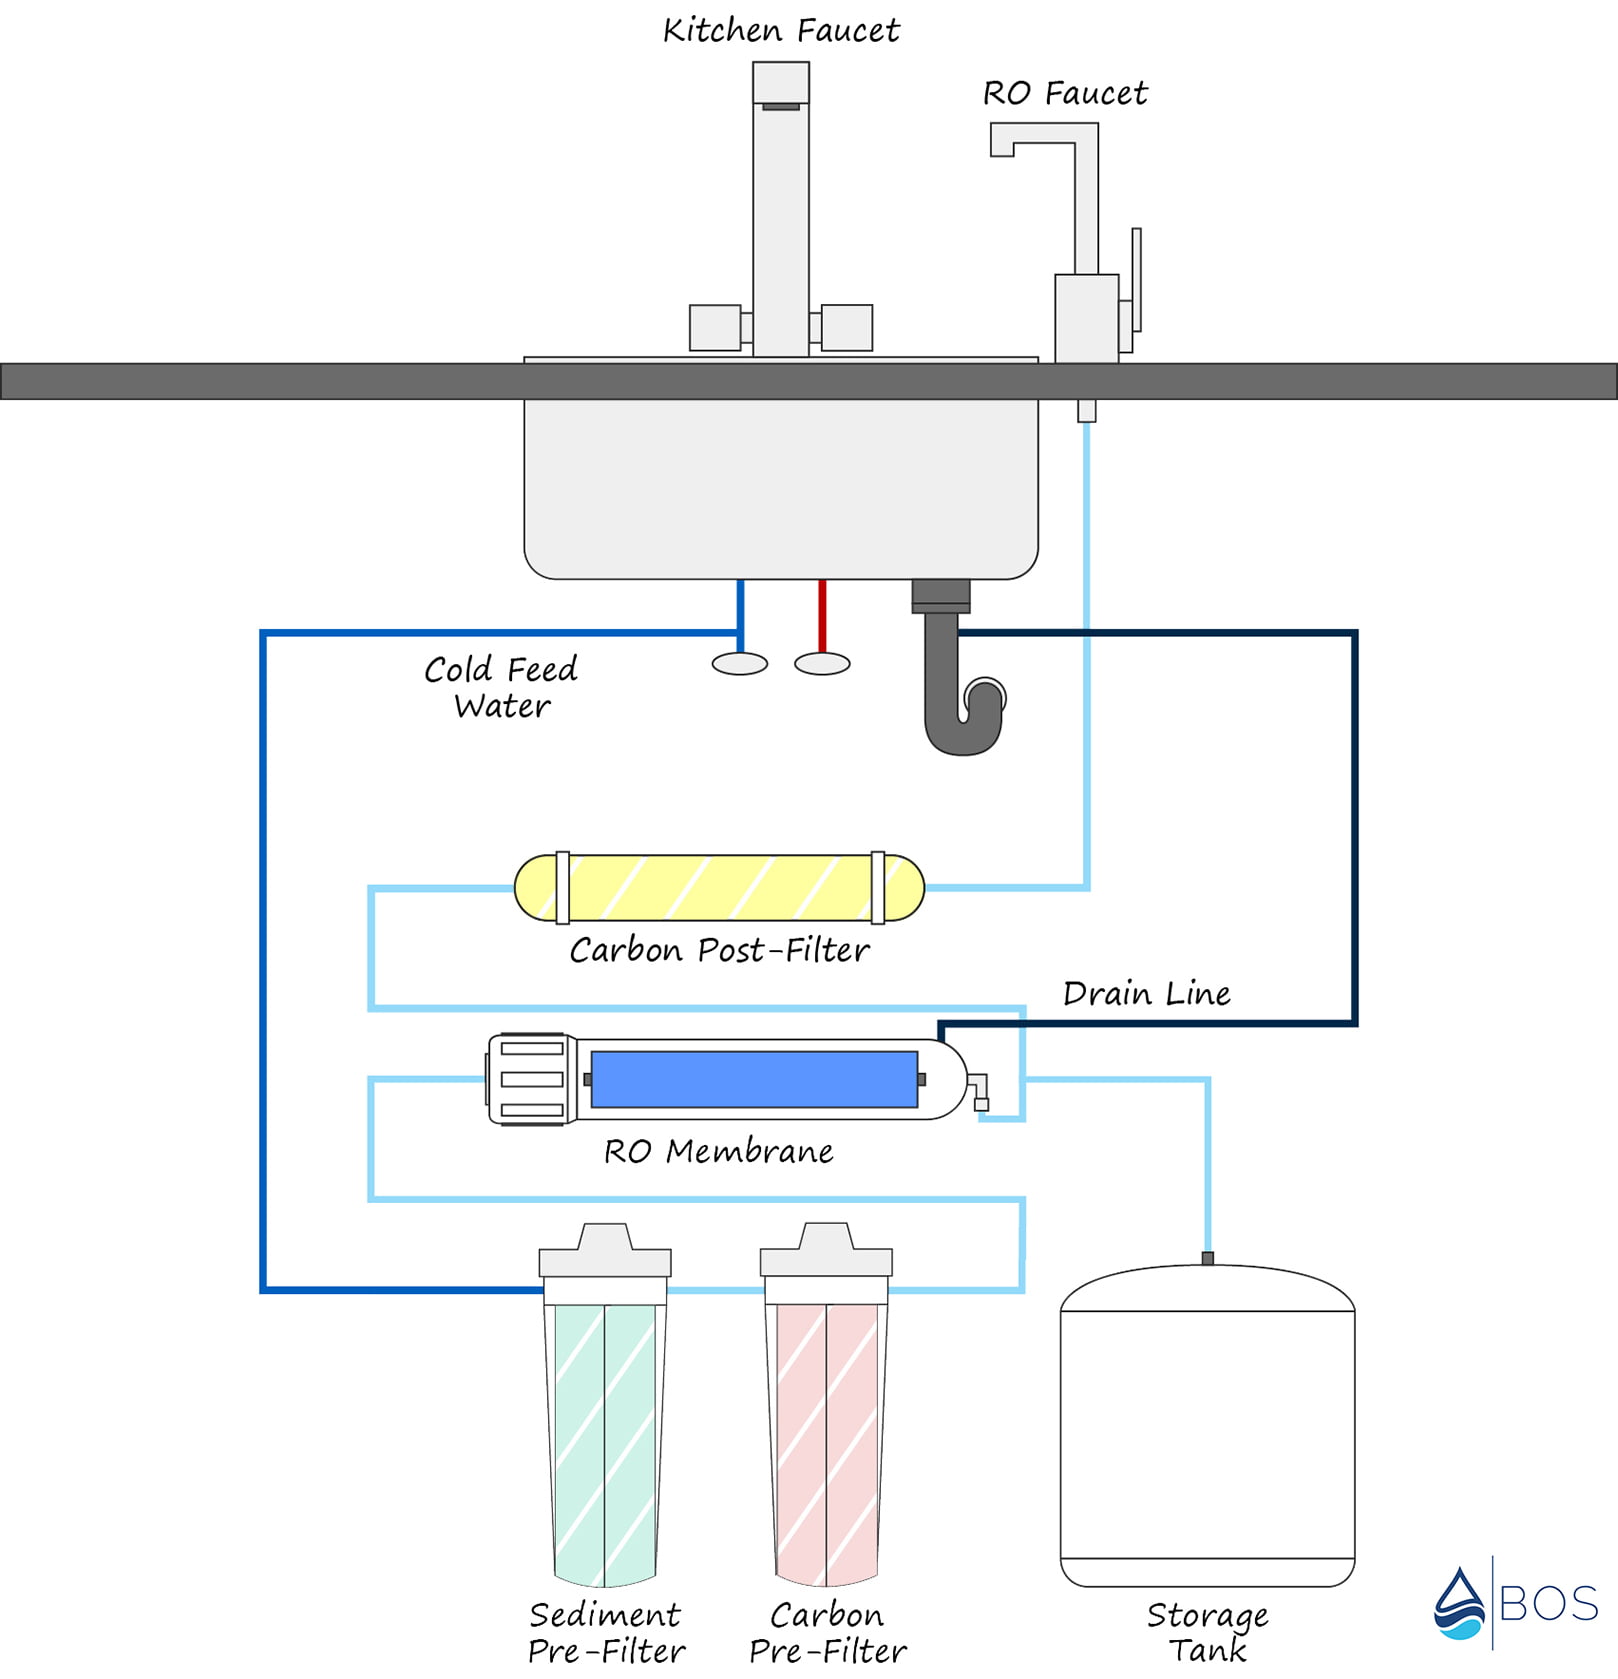
Reverse Osmosis System Installation Diagram
Here is our reverse osmosis system installation diagram. It shows an under sink reverse osmosis water filter with 2 pre-filter stages, the RO membrane, a carbon post-filter, a storage tank, and the reverse osmosis water dispenser.
Reverse Osmosis Water Filter System Components
As you can see, a reverse osmosis system is split into multiple components. Each of those has a dedicated purpose. Here’s what you need to know.
Module
The module’s main purpose is to just connect all of the various components of the system in one centralized spot, providing inputs and outputs as well as threads for screwing different connectors.
Pre-Filter Stages
Pre-filtration is important in a reverse osmosis system. Reverse osmosis alone cannot handle all types of contaminants effectively. Some of them might end up clogging your membrane if they are in too high concentrations. Usually you would use a sediment filter and a carbon filter at this stage. Other types of pre-filters might be necessary depending on the quality of your water.
Reverse Osmosis Membrane
The main component of a reverse osmosis system is the membrane. The membrane is lined with microscopic pores, which are tiny enough to only allow water molecules to pass through. Water is pushed through this membrane at a high pressure, achieving purification.
Post-Filter(s)
Post-filters might be used to additionally purify water after it has passed through the reverse osmosis system. Once again, the exact type of filters used here will depend on the purity of your water.
Water Tank
One of the main disadvantages of reverse osmosis is that it’s a slow process. To compensate for that, many setups use a large storage tank which holds filtered water until you’re ready to use it. Keep in mind that making the tank too large can have some drawbacks of its own. For example, water might develop a stale taste after it’s been sitting in the tank for a long time.
Water Dispenser
A water dispenser is used for convenient access to filtered water. This usually comes in the form of a separate faucet.
Drain Line and Saddle
This is the part that allows the reverse osmosis system to get rid of all of the wastewater it generates.
Water Inlet
This is where input water comes from. It’s simply a connection for the cold water supply of your plumbing.
Automatic Shut-Off Valve
Using an automatic shutoff valve is a great way to optimize the performance of your RO system and ensure that it doesn’t run when it shouldn’t. The valve simply turns the system off once the storage tank is full.
Check Valve
A check valve is necessary to prevent damage to the system by blocking the flow of water coming back from the storage tank or drain line.
Flow Restrictor
The flow restrictor limits the rate of wastewater and ensures that the RO system can maintain a high enough pressure for the water to make it through the membrane.
Tubing
Tubing is used at various points of the system to connect its components.
Fittings
Fittings are necessary to ensure that everything is hooked up tightly and nothing leaks.
Best Location to Install…
There is an ideal spot to install every component of your reverse osmosis system. You should take some time to familiarize yourself with that to ensure optimal performance.
The RO System Module
The main RO system module should ideally be attached under your kitchen sink. But it can also be placed in its own separate room if space is a concern. The main consideration here is to ensure that it doesn’t freeze.
The RO Faucet
The most important thing for your reverse osmosis faucet is to ensure that it’s on a flat surface. You may have to drill a specific hole for it if you don’t already have one in your sink.

The Tank
It doesn’t really matter where you place the storage tank as long as it’s within 10 feet of the reverse osmosis faucet. You can even put it on its side if there is not enough room to keep it upright.
The Drain Saddle
As a rule of thumb, you should always install the drain saddle above the P-trap. It should not be near the garbage disposal or dishwasher lines because otherwise it could be more prone to clogging.
How to Install an RO System Step by Step
Here is a brief overview of installing a reverse osmosis system. Keep in mind that some steps might differ in your case depending on the exact configuration you’re going for.
What You Need
- Drill, variable-speed, at least 2,500 RPM if you’re planning on drilling through steel
- Drill bits
- Screwdriver
- Adjustable wrench
- Teflon tape
- Tubing cutter
- Hammer
- Center punch
Step 1: Faucet
First, you should drill a hole into your countertop or sink and install the faucet in it.
Step 2: Drain Saddle
Then install the drain saddle on the sink drain line, keeping it as far away as you can from your dishwasher and garbage disposal.
Further Reading:
Step 3: Feed Valve
Release the pressure in the water supply under your sink by opening your faucet. Remove the tubing from the cold water valve, and install the new valve.
Step 4: Storage Tank
To hook up the storage tank, all you need to do is wrap the port at the top with Plumber’s tape and then screw on the connector.
Step 5: RO Module
Connect the reverse osmosis module by paying attention to all color-coded tubing.
Step 6: Filters and Membranes
Then, hook up all filters and membranes.
Step 7: Check for Leaks
After that you should open the feed water valve to check for any leaks.
Step 8: Flush the System
Keep the system running to allow it to flush out any debris.
Step 9: Fill and Drain the Tank
Finally, fill the storage tank once, drain it, then repeat the process.
Video
Here is a video providing you with an overview of all involved steps.
DIY Install vs Hiring a Plumber
Installing a reverse osmosis system yourself is always possible and you don’t necessarily have to hire a professional. However, if you don’t know exactly what you’re doing, it’s highly recommended to work with a qualified expert. Otherwise you might damage the system and what’s worse, that might not even be covered by your warranty. Hiring a professional should cost a few hundred dollars.
Benefits of Installing an RO System at Home
There are many benefits of installing a reverse osmosis system in your home, such as:
- Always have access to clear, fresh water
- Motivate yourself to stay hydrated
- Avoid spending money on bottled water
- Enjoy crystal clear ice cubes
If you have any questions about our RO water filter connection diagram please don’t hesitate to leave a comment below!
About the Author Alexandra Uta
![]()
![]()
![]()

Information provided on BOS is for educational purposes only. The products and services we review may not be right for your individual circumstances.
We adhere to strict editorial guidelines. Rest assured, the opinions expressed have not been provided, reviewed, or otherwise endorsed by our partners – they are unbiased, independent, and the author’s alone. We fact-check all content for accuracy. It is accurate as of the date posted and to the best of our knowledge.