This page may contain affiliate links. If you buy a product or service through such a link we earn a commission at no extra cost to you. Learn more.
Is it possible for you to make your own DIY whole house water filter in order to save money, and if so how? Also, are there any drawbacks to this? What are the things that you have to consider? Where do you even start?
We are going to answer these and many more questions in the following article. Ready to take on your next DIY project? Let’s go!
These are some general tips and guidelines on how to make a DIY whole house water filter:
Have your water tested to find out what you’re dealing with.
The basic idea is to take multiple separate whole house water filters and connect them in series. For example, two sediment filters (20 and 5 microns) followed by a carbon filter.
Tip: Choose industry standard sizes for the largest selection of filter cartridges.
You need to have basic plumbing skills and be handy with tools.
Why Build Your Own Home Water Filtration System in the First Place?
Pros
Most importantly, you will save quite a lot of money when you do everything yourself. Whole house water filters are not exactly cheap.
You will become a water expert along the way and know your system by heart which makes installation, filter replacements and troubleshooting so much easier.
You are free to choose whatever components you want. If you prefer catalytic over activated carbon, great. If you don’t consider a post-filter to be necessary, not a problem!
All that’s needed apart from the filters are common plumbing supplies that you can get at your local hardware store at a low price. You might even be able to use some of the old materials that are currently gathering dust in your garage.
You can make modifications later on if you like.
Cons
You cannot be 100 percent certain about the filtration effectiveness of your system without having the filtered water tested by a certified lab which is costly.
It requires time.
A Word of Caution:
Many of the DIY water treatment methods that you can read about online might be suited for emergency situations where clean water is inaccessible. However, they don’t provide a healthy drinking water solution in the long run for two reasons:
They are impractical and don’t deliver a sufficient amount of water for whole house use – think drinking, cooking, showering, laundry.
They miss many of the potentially harmful contaminants that might be lurking in your water.
Bottom line: NSF-certified filters are still the best way to ensure that the water in your home is clean and safe.
How to Make Your Own DIY Whole House Water Filter
It’s time for you to learn how you can build your own whole house water filtration system. First, we will get into the benefits of having your water tested before we even start thinking about what your perfect system could look like. Then you get a list of tools and other components that are required. And finally, you will learn how to set everything up step by step.
Having Your Water Tested
It’s simple: You cannot know what filtration requirements you have without knowing the condition of your water. This is why it’s always a good idea to have your water professionally tested.
It also makes a difference if you are on well or city water. Most city waters, for example, contain either excess chlorine or chloramine used for disinfection. Well water on the other hand might contain large amounts of sediment, iron, manganese and hardness minerals.
Bottom line: If you want to make sure that you get the cleanest and safest water possible, conduct the testing first so that you know what you are dealing with. Then you can choose filtration components accordingly.
What You Will Need
It goes without saying that you have to have some very basic plumbing skills for this to work. Or at least you should be somewhat handy with tools – everything else you can learn by doing.
Oh, and a little bit of patience wouldn’t hurt either…
Other than that, here is a list of tools and accessories that you will need:
Tools & Accessories
Drill
Drill bits
2x adjustable wrench
Pipe cutter or hacksaw
Bucket
Teflon tape
Screwdriver
Solder supplies (optional)
Mounting brackets (not always)
Tubing
Shut-off valves
Bypass valves (optional)
Pressure gauges (optional)
Different kinds of connectors, e.g. push fittings, elbows, tees, …
System Components
The basic idea is to take multiple separate whole house filters and connect them in series. Thereby you can choose between housings that can accommodate 10″ or 20″ cartridges that are either 2.5″ or 4.5″ (big blue) in diameter.
These are industry standard sizes meaning that almost every company on the market has cartridges made that fit these housings. In other words, they are interchangeable. This has 2 benefits:
You can choose from an infinite selection of filters specialized in nitrate reduction, arsenic reduction, lead reduction – whatever you require.
You can make huge savings as many no-name products are much more affordable than what you have to pay for a cartridge of the same quality sold by one of the popular brands.
Thus you want to stay away from proprietary filters and housings. They won’t fit anything else so that the manufacturer can charge a lot more for them.
By the way, the larger the filter size, the greater the maximum flow rate. 2.5″ x 10″ might provide 2.5 gallons of filtered water per minute which is not sufficient for whole house use.
With 2.5″ x 20″ you can about double that flow rate – which still isn’t enough in most cases. We recommend going even bigger and opt for 4.5″ x 20 (10)”. That’s definitely enough even for larger homes with 2-3 bathrooms or more.
A bigger filter also has the advantage that it requires less frequent replacements.
Whatever filter(s) you go for, it’s always best if they were tested and certified against NSF Standards (42 and/or 53) which guarantees filtration effectiveness.
Step-Down Sediment + Carbon Filtration
Step-down filtration is for applications with multiple (sediment) water problems. For instance:
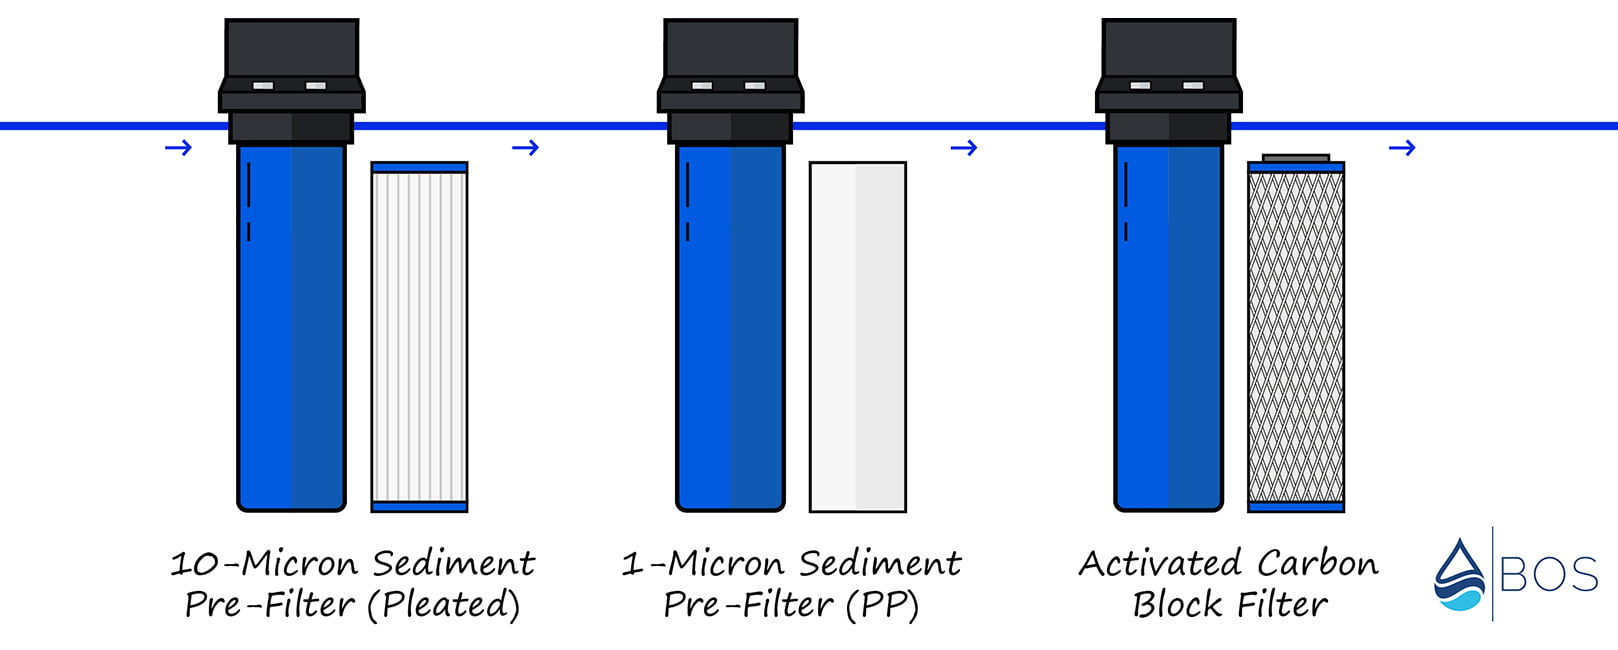
You can use 3-stages of filtration starting with a 20-micron sediment pre-filter, followed by 5-micron and lastly a 1-micron filter stage.
The pre-filter will trap larger particles to protect all subsequent filter stages from clogging prematurely. If you are on a well supply, you might have to start with a 50-micron pre-filter to remove sand, dirt and rust before everything else.
FYI:
1 micron is a thousandth of a millimeter. As you probably have already guessed, a filter rated at 1 micron can also capture particles down to a size of 1 micron, such as bacteria. Thus a smaller micron rating indicates a more thorough filtration.
The dilemma: The smaller the micron rating, the lower the water flow rate. Now keep in mind that a whole house filter has to provide enough water for your entire home. Therefore, sufficient water flow is mandatory unless you don’t mind a drop in pressure when using multiple water outlets at the same time. What’s more, each additional filter will contribute to the flow/pressure decrease.
You can also mix in 1 or 2 activated carbon filter stages for improved water taste & smell (and safety) – in fact that’s what we recommend. You have the choice between granular carbon and a carbon block filter. Both are great at removing chemicals like chlorine and its byproducts. They also help with other natural and synthetic compounds – think pesticides, heavy metals such as lead, chromium, arsenic, nitrates and so on.
If your city supply uses chloramine instead of chlorine for water disinfection, regular activated carbon won’t suffice. A much longer contact time would be required to achieve noteworthy results, which is problematic for whole house applications. That’s where catalytic carbon comes into play. We like to call it carbon on steroids. It can effectively eliminate chloramine and chloramine by-products and just like regular carbon also reduces THMs and VOCs.
Do you receive water from a private well? Then you might require a specialized iron/manganese filter or a softener to tackle water hardness. In some cases, well water is also polluted with chemicals and microorganisms from agricultural runoff. Unfortunately, we can’t give you more advice than that without knowing your water situation.
A shut-off valve before and after the filter setup allow for easier cartridge replacements. And whenever you have to service your system you can simply open the bypass so that your family still has access to water in the entire house.
Especially if you are on a private well, a sediment pre-filter has to do a lot of initial work to remove the larger contaminants from your water. As a result, it will clog up quickly and require more frequent replacements.
This is not only inconvenient, you will also have to keep a stock of replacements cartridges or order new ones on a regular basis, both at additional cost.
So consider adding a drain line connection to your sediment filter(s) for backwashing. This way, any trapped sediment that accumulates over time will be discharged out of the filter body. However, this does not work with all types of sediment filters, such as solid propylene block filters. Pleated ones on the other hand are fine.
Using an automated timer-based valve that opens for a minute or so each day even allows for self-cleaning. All that is left for you to do is check the batteries every once in a while – it doesn’t get any more convenient!
The Setup
The setup itself is pretty straightforward. Because we’ve already covered how to install a whole house water filter here, we won’t go into great detail about it now. Just a couple of hints:
Make sure that you comply with local plumbing codes.
Avoid outside installation if possible.
Choose a location that’s easily accessible and close to where the main water line enters your home so that you have filtered water at every outlet. If you want unfiltered water outside, split off those lines before the filtration chain.
Go upstream of your water heater.
Start by shutting off the main water supply to prevent major leaks. You also want to drain all remaining water by opening nearby faucets and other fixtures.
The installation itself will require a lot of dry fitting. Push fittings are great if you don’t like to solder.
Apply plumber’s tape on all threaded ends for proper sealing.
Be careful not to over tighten any plastic fittings to prevent cracks.
Grease O-rings and make sure that they sit tight.
When done, check for leaks. Then flush the entire system for several minutes to remove any installation debris. Different filtering media also require priming. Follow manufacturer instructions here.
On top of that, you can find many helpful installation videos on YouTube:
If you have any questions about how to make your own whole house water filter, please don’t hesitate to leave a comment below!
About the Author Gene Fitzgerald
Gene Fitzgerald is one of the founders of BOS and currently head of content creation. She has 8+ years of experience as a water treatment specialist under her belt making her our senior scientist. Outside of BOS, Gene loves reading books on philosophy & social issues, making music, and hiking.
Learn more about Gene and the rest of the BOS Team.
Information provided on BOS is for educational purposes only. The products and services we review may not be right for your individual circumstances.
We adhere to strict editorial guidelines. Rest assured, the opinions expressed have not been provided, reviewed, or otherwise endorsed by our partners – they are unbiased, independent, and the author’s alone. Our licensed experts fact-check all content for accuracy. It is accurate as of the date posted and to the best of our knowledge.
If I already have a water softener and want to add additional filtration for other contaminants, is there any difference between a manganese,sulfur, iron removal system ($700 to $1500) and the water softener? I still have Iron at 1ppm and hydrogen sulfide from the hot water heater and am hoping to bring those down further with standard 10 and 1 micron sediment filters and carbon block.
Hey Steve,
Absolutely, there is a huge difference between a water softener and an iron removal system for example. When trying to reduce iron/hydrogen sulfide, using sediment and carbon filtration might not bring the best results. Check our iron removal guide for more info. It’s linked in the main menu at the top.
Hi Donald,
Thanks for asking. That’s very kind of you. Please feel free to order anywhere you want. We’re currently in the process of restructuring our site.
The Berkey filter is great. The steel containers are sturdy and the filter really does clean the water better than any other system I have used. The initial outlay can be a bit eye popping but when you figure the cost of installing a whole house filtration system or buying cases of water or water bottles for a water cooler over the life of your households water consumption, this is one of the very best options you can consider.