How to Clean a Water Filter Pitcher? Step by Step Instructions!
Written by: Gene Fitzgerald // Last Updated: Aug 25, 2023
This page may contain affiliate links. If you buy a product or service through such a link we earn a commission at no extra cost to you. Learn more.
Water filter pitchers are probably the most convenient means to purify your water. The good ones remove harmful contaminants like lead and arsenic, and invisible chemicals including chlorine and pesticides. Some high-tech ones even remove chromium 6 and PFAS/PFOAs.
But if you are here, you already own one and know why pitcher water filters are all the rage. Regardless, it’s reassuring to hear this, right?
Most people would like to believe their filter pitcher doesn’t get dirty. They just carry filtered water and rest snugly inside the bacteria-free cold fridge all day.
The truth is, just like any other piece of water treatment equipment, your pitcher needs a deep clean once in a while. Since most units are made with plastic, they are susceptible to mildew or mold growth and require regular cleaning.
We’ll get right to business and explain how to quickly and effectively clean a water filter pitcher, plus tips to keep it cleaner longer. Undoubtedly, a clean filter pitcher equals cleaner and safer water.
Contents
show
Key Takeaways
Instructions for cleaning a water filter pitcher:
- Discard any leftover water.
- Remove the lid and take out the filter element + upper reservoir.
- Discard the filter cartridge if it has exceeded its filter life. If it still works fine, rinse it with water.
- Use water and dishwashing detergent to clean the jug, lid, and upper reservoir. You can scrub with a soft brush or sponge.
- Rinse everything with warm water multiple times to ensure all soapy water is removed.
- Reassemble.
Preparation: What You Will Need
All you need to clean your water filter pitcher is perhaps already available at your home. There are no unique cleaning products or sanitizing chemicals required; just plain old soap and water.
Of course, you need a tidy countertop or table to keep the pitcher components while you wash the rest of it.
Here’s a checklist for all other items that you should keep at hand to make cleaning even quicker.
- Liquid dishwashing soap
- Vinegar (in case of mildew)
- Water (preferably warm)
- Sponge
- Small brush
- A bucket or small container to soak the pitcher
- Lint-free microfiber towel/paper towels
- Drying rack
- Replacement filter (if needed)
Instructions for How to Clean a Water Filter Pitcher
The following step-by-step cleaning procedure is suitable to clean any model and brand of water filter pitcher. Mostly, all pitchers feature the same or a similar design with curves, crevices, reservoirs and hollows in the handles. Let’s get busy.

1. Disassembly
The first step is to take apart the filter. Divide and conquer!
Begin by removing leftover water from the jug. Then, carefully remove the lid and take out the filter element and the top reservoir. Discard your filter cartridge if it has served its life (typically 1 to 3 months). If it’s still working fine, rinse it with warm water and keep it in a safe place while you wash the jug.
Some models like the Clearly Filtered Pitcher are far easier to disassemble compared to a Brita. If the reservoir in your Brita doesn’t come out easily, hold a flat screwdriver under the tab at the handle and gently flick it. The reservoir will pop out.
2. Washing
Make a solution of water and dish soap. Then pour it in the lid, the pitcher, and the reservoir. Swish it around and let it sit for fifteen minutes.
Pitchers that feature a chrome lid or electronic display should only be wiped with a soft, damp cloth. You can use soapy water or add a vinegar solution as required. Just be careful not to submerge the lid.
Bonus Tip: Some people use the age-old technique and add a few lemon slices to the pitcher. The lemon gives a deep clean and cancels out any odors.
3. Scrubbing
Use a sponge or small soft brush to get into the nook and crannies and scrub the stuck-on dirt and grime. Make sure you reach all the curves, crevices and gaps without tempering the seal (if applicable). To easily scrub hard-to-reach spots use a toothbrush.
4. Rinsing
Rinse the filter pitcher with warm water multiple times to make sure all soapy water is drained out.
5. Drying
After the soap is completely removed from all parts of the filter, turn the jug upside down on a bottle drying rack.
Again, it’s essential to let the pitcher air dry completely. Alternatively, if you are in a rush, use lint-free towels or paper towels to dry the container.
6. Priming the Filter Element
While your pitcher dries out, prime your new filter cartridge. All pitcher filter cartridges have different instructions to prime them. Depending on your model, you may use any of the following ways to prime them.
For Brita Standard and Longlast Filter:
- Flush the filter with cold water for 15 seconds.
- Insert it into the reservoir, carefully aligning the channel in the filter with the rim in the reservoir. Make sure it sits tight.
- Fill in cold tap water and discard the first three rounds of filtered water. This will flush the filter and get rid of loose carbon particles.
For Brita Stream Filter:
- Flush the filter cartridge with cold water for 15 seconds
- Insert it in the pitcher and reassemble as instructed. It does not need any further priming.
For Clearly Filtered Pitcher Filters:
- Unscrew the flushing disk on the new filter and remove the protective sticker from the top.
- Fill a bowl with water and soak the cartridge in it for fifteen minutes. Ensure the filter stays in the water and does not float.
- After 15 minutes, screw on the flushing disc.
- Place the white flushing adapter to your faucet firmly. Turn on the water and allow the filter to flush for approx one minute.
- Reassemble as instructed.

7. Reassembly
Lastly, put all the pieces back together, ensuring the filter fits perfectly and the seal is in place. It is essential to follow the exact instructions related to your pitcher water filter model to avoid leakage and poor performance.
Further Reading:
Additional Tips
That wasn’t hard, was it? No wonder water filter pitchers are fuss-free and low-maintenance. Here are a few bonus tips and tricks to keep your pitcher in excellent shape.
How Often to Clean Your Filter Pitcher?
Ideally, you should quickly rinse your water filter pitcher once a day or every time you use up one full reservoir. Washing with warm water and soap should suffice for weekly cleaning – no need to soak or bring out the sponges and brushes.
You must, however, deep clean your pitcher at least twice a month to prevent the growth of mold or bacteria and keep away nasty smells.
Not to forget, all new filter pitchers must be washed thoroughly before use.
Can You Use Bleach to Clean a Water Filter Pitcher?
The minute you see slimy and dark green mold growth on the pitcher’s lid or bottom, you are tempted to use household bleach.
While bleach is generally harmless and mostly used for disinfection, we advise against using bleach or any harsh chemicals to clean your pitcher.
Unless the bleach is washed out properly, there are chances of severe side effects.
Can You Put Your Water Filter Pitcher in the Dishwasher?
Most water filter pitchers are not dishwasher safe. The parts and jug could get disfigured when placed in the dishwasher due to hot water, harsh detergents, and water pressure.
Thus, you want to check the manual first if you can put your water pitcher in the dishwasher.
If you want to be on the safe side, always handwash all parts to avoid problems.
Removing Mineral Buildup
If your water supply is hard (don’t worry, most Americans have the same problem), then you are likely facing mineral buildup in all your water-based appliances.
What appears to be a white powdery residue is, in fact, limescale from excess minerals in your water supply.
You can easily remove mineral deposits from your water pitcher by using:
- Lemon juice
- White vinegar
Vinegar is highly acidic and dissolves the calcium film on surfaces. Just fill-up the pitcher with vinegar and let it sit for a couple of hours.
There is no need to discard the vinegar; you can toss it back into a bottle and use it the next time you see a whitish film.
Since bacteria don’t grow in vinegar, it’s safe to use this soaking vinegar solution repeatedly.
Finally, use warm water and wash your water filter pitcher as usual.
Mold and Mildew
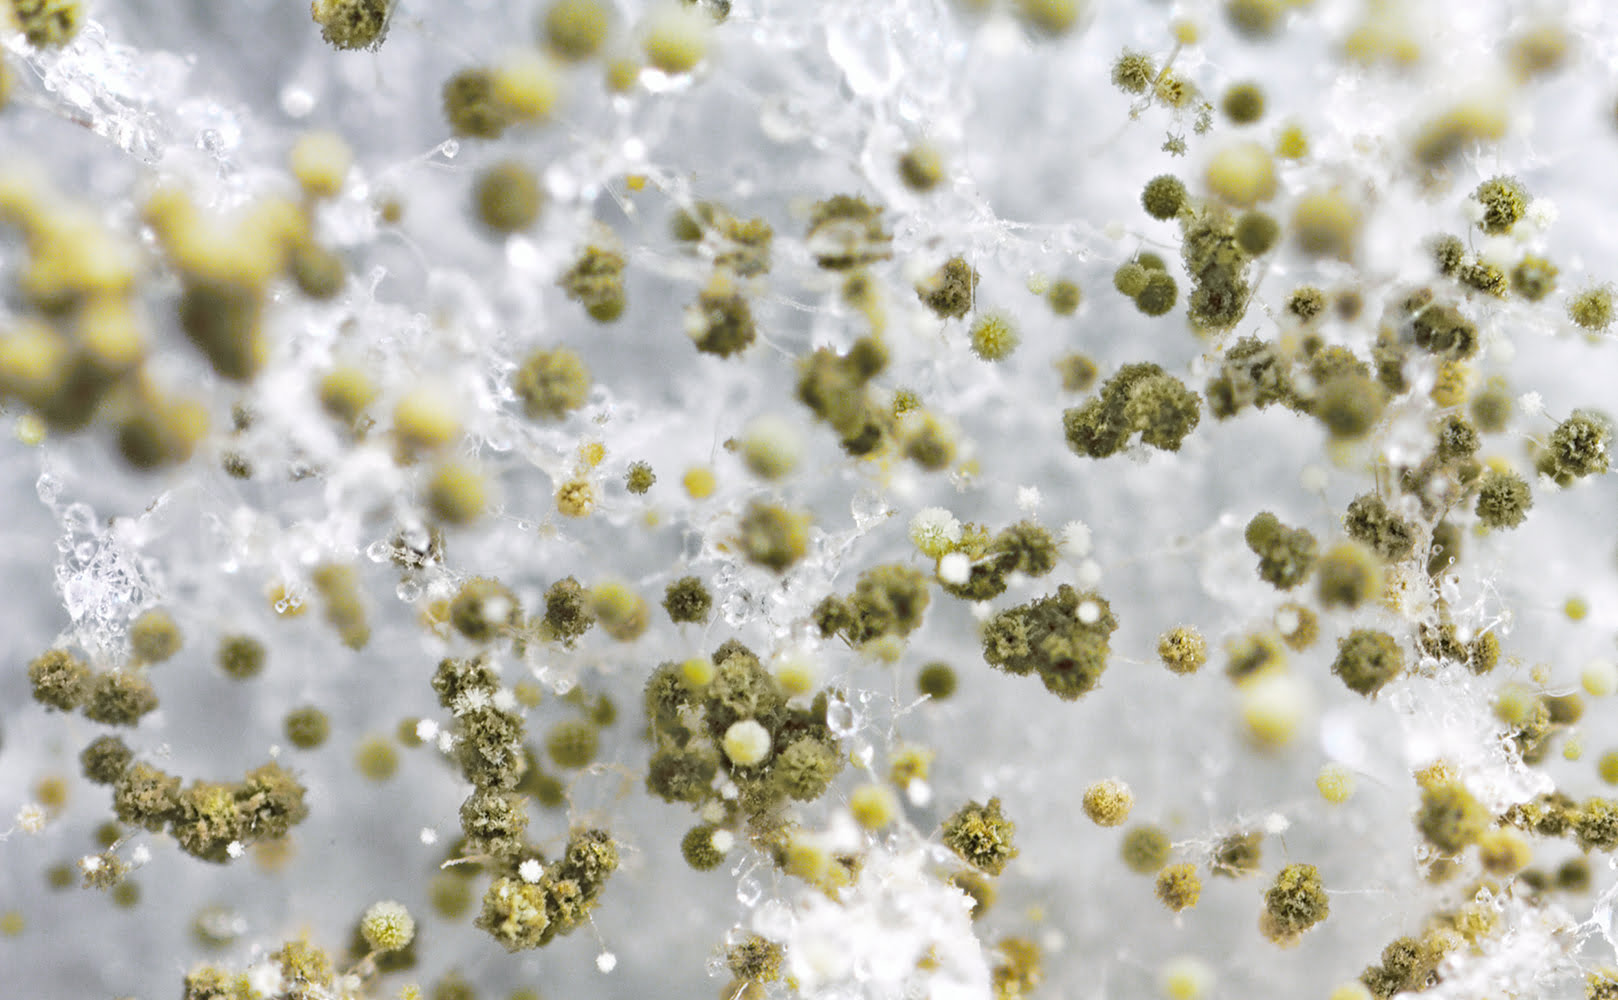
Mold and mildew can grow anywhere as long as they find favorable conditions. They love damp areas with high moisture. Unfortunately, mold exposure is directly linked to many issues like allergic reactions, asthma and breathing difficulties.
Prevention
If you are experiencing recurring mold or musty smell from your water filter pitchers, you aren’t alone. It’s a common problem that can easily be prevented by replacing the filters on time. If the filter cartridge is not changed according to schedule, there will be repeated occurrences of mold.
Secondly, you must allow the filter pitcher to dry completely before assembling it. Let it air dry upside down on a bottle rack.
Third, ensure that you wash all surfaces properly, including the lid, the reservoir, the hollows of the handles, and the nooks and crannies on the jug.
Cleaning
For the stubborn mildewy bits, attack them directly with a solution of vinegar and water. Vinegar has antifungal and antibacterial properties. Therefore it is an effective and inexpensive treatment for removing mold from many household utensils.
Add a teaspoon of vinegar to a cup of water and dip an old toothbrush into it. Scrub the surface carefully. Follow up with a warm water rinse and air dry.
If you have any questions about how to clean a water filter pitcher please don’t hesitate to leave a comment below!
About the Author Gene Fitzgerald
![]()
![]()
![]()
![]()
![]()
![]()
![]()

Information provided on BOS is for educational purposes only. The products and services we review may not be right for your individual circumstances.
We adhere to strict editorial guidelines. Rest assured, the opinions expressed have not been provided, reviewed, or otherwise endorsed by our partners – they are unbiased, independent, and the author’s alone. Our licensed experts fact-check all content for accuracy. It is accurate as of the date posted and to the best of our knowledge.