How to Remove a Reverse Osmosis System | Step-by-Step Guide
Written by: Gene Fitzgerald // Last Updated: Aug 15, 2023
This page may contain affiliate links. If you buy a product or service through such a link we earn a commission at no extra cost to you. Learn more.
If you have a reverse osmosis system, there may come a time when you need to remove it.
This is a straightforward procedure if you have a countertop model, but an under sink reverse osmosis system with a storage tank is slightly more involved. The process is not difficult to understand, but there may be some issues when it comes to accessing the connections to unscrew or remove them, particularly if you do not have specialized wrenches.
This handy guide should make removing your reverse osmosis system as easy as possible.
Contents
show
Key Takeaways
Here is how to remove a reverse osmosis system step by step:
- Step 1: Turn off the water supply to the RO system, your sink, and possibly the household.
- Step 2: Open the RO faucet: Allow it to run until it stops dripping,
- Step 3: Close the RO storage tank valve: Do this by turning the valve counterclockwise.
- Step 4: Disconnect all system tubing: This includes drain line, the tube that connects the storage tank and RO system module, the tube that connects the filter to the water supply, and the tube connecting the storage tank to the RO faucet.
- Step 5: Remove the RO storage tank: Carefully lift the water tank from under the sink.
- Step 6: Remove the RO faucet: Unscrew the nut that holds the faucet under the sink using your wrench.
- Step 7: Remove the RO system module: If your RO system is mounted, unscrew it and carefully lift out the RO module.
- Step 8: Remove the RO feed water valve: Disconnect the feed water valve from the RO system and reconnect the kitchen faucet line.
- Step 9: Plug the countertop hole: Use a soap dispenser or a plug/cover.
- Step 10: Remove the drain saddle and plug the hole in the drain line: Use putty or install a plug.
- Step 11: Open the water supply: Let it run for some time to check for leaks.
How to Remove a Reverse Osmosis System Step by Step
So, how to remove a reverse osmosis system?
Well, you’ll need the following tools, and then simply follow the step by step process as outlined below.
Side note: If you feel out of your depth, a licensed plumber is always an option and should be able to take your reverse osmosis system apart relatively quickly.
Tools
To take apart and remove your reverse osmosis system, you will need the following:
- An adjustable wrench or different-sized wrenches.
- A screwdriver.
- A sinkhole cover or soap dispenser.
- Putty (a permanent solution).
- Some old towels to clean up any drips or spills.

Step 1: Shut Off the Water Supply
Before any kind of plumbing procedure, the water supply should be shut off. There should be a water shut-off valve under your sink, which will need to be turned off, as well as possibly the whole house water supply if you don’t entirely trust your under-the-sink valves.
Step 2: Open the RO Faucet to Drain the Filter System
Next, you will need to depressurize and drain the reverse osmosis system including the storage tank. To do this, turn on your reverse osmosis faucet and let it run until it stops.
Step 3: Close the RO Storage Tank Valve
Close the reverse osmosis storage tank valve by turning it counterclockwise. For this step, you may need pliers or a wrench to get a tight, secure closure.
Turning off the storage tank valve will ensure no water comes flooding out when you unscrew the components of the system for removal.
Step 4: Disconnect All Tubing
Have your old rags or towels nearby to catch any drips that come out once the tubing is disconnected.
Disconnecting the tubing should be simple enough by twisting or pulling it (push the collar in), depending on your fittings.
You will need to disconnect the drain line from the drain saddle, the tube that connects the storage tank and filter, the tube that connects the filter to the water line, and the tube connecting the storage tank to the RO faucet.
Step 5: Remove the RO Tank
Now that all the tubes are disconnected, you can carefully lift the water tank from under the sink. This should not be too heavy because of the drainage step.
Step 6: Remove the RO Faucet
This is the part that could get a bit tricky. You need to maneuver yourself under the sink and get the wrench onto the nut that holds the RO faucet under the sink. They actually do make specialized wrenches for this purpose if you are lucky enough to have one of those on hand; otherwise, it may take some awkward twisting to get yourself into position.
Once you have the wrench on the nut, unscrew it, and the faucet should come right off. Now you can move on to the next step.
Step 7: Remove the Reverse Osmosis System Module
If your RO system is mounted under your sink, you will need to unscrew it using your screwdriver. Carefully lift the reverse osmosis system module out from under the sink.
Step 8: Remove the RO Feed Water Valve
Once you remove the reverse osmosis feed water valve, you must reconnect the cold water supply line to your kitchen faucet.
Step 9: Plug the Sink/Countertop Hole or Use Otherwise
You have several options for dealing with the empty hole in the countertop or sink. Some choose to plug it permanently, but keep in mind that if you want to use the hole in the future, it might have to be re-drilled and sanded.
Another option is to add a soap dispenser instead of an RO faucet. Or, you could use a simple plug/cover, such as a brushed nickel cover, to cover the hole. To install the cover (or soap dispenser), simply place the foam piece over the hole, place the cover into the hole, and then hold it in place while a second person screws the nut for the cover underneath the sink.
Step 10: Remove Drain Saddle and Plug Hole in Drain Line
Then, you will need to remove the drain saddle and also plug that hole.
First, you will need to loosen the nut on top of the saddle and slide it off. Once removed, place a plug into the hole. Then, check your drain pipe after the P-trap faces downwards.
You could also plug the hole in the drain line with a putty suitable for wet surfaces, but keep in mind that this is a permanent solution.
Further Reading:
Step 11: Open the Water Supply
The moment of truth is next, turning your water supply back on, at the mains if you switched it off there, and then opening the valves under your sink. Open your regular kitchen faucet and let it run at full blast for several minutes while you check for leaks.
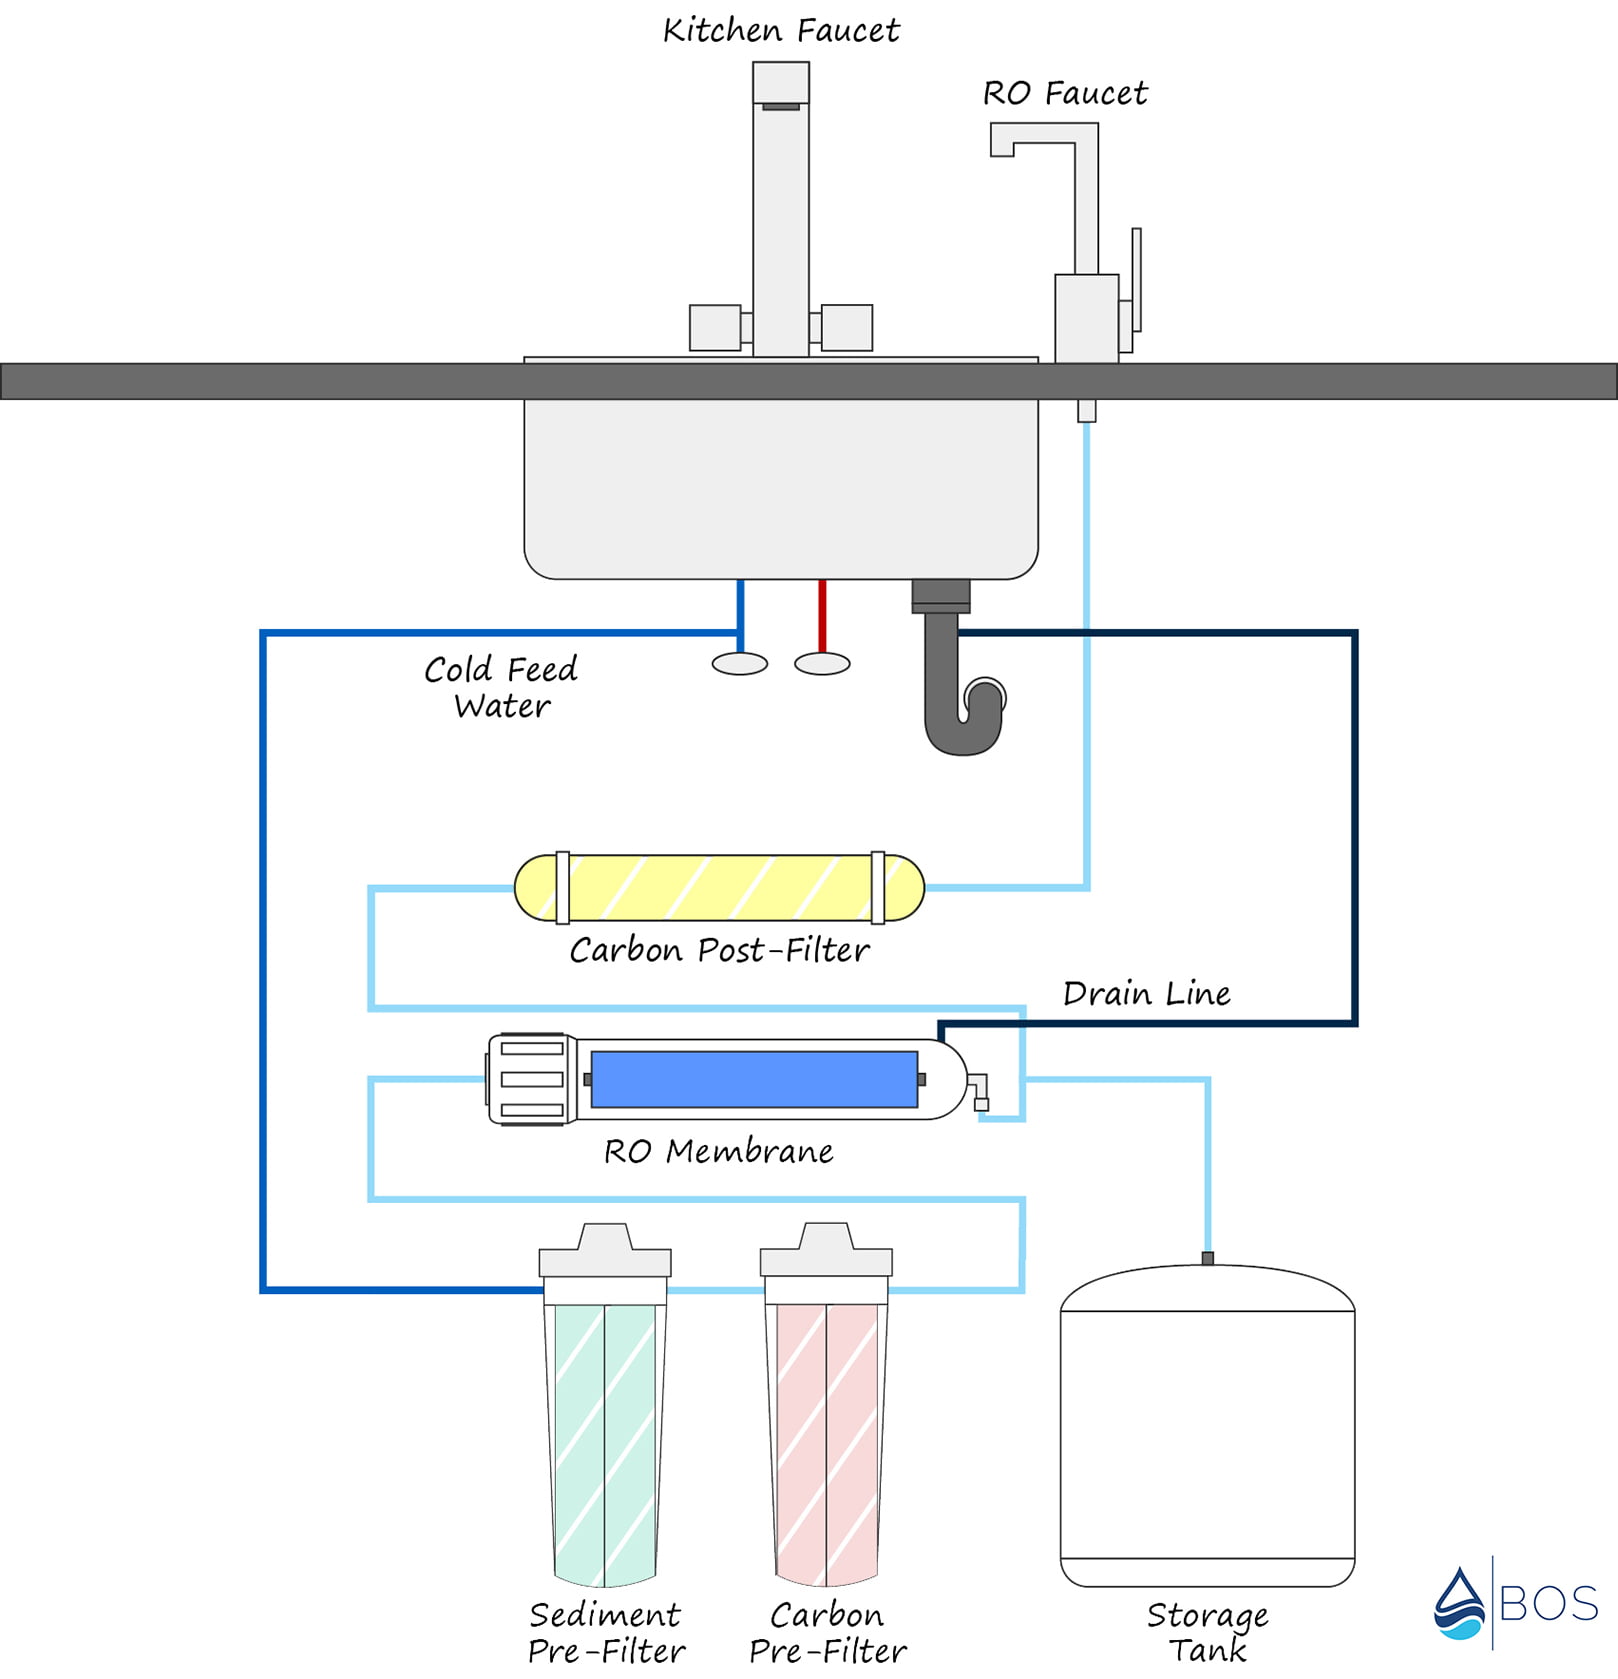
Reverse Osmosis Installation Diagram
The following is a diagram of an under sink reverse osmosis system so that you can better understand how the system works in order to have a better concept of how to remove it safely and easily.
If you have any questions about removing a reverse osmosis system please don’t hesitate to leave a comment below!
About the Author Gene Fitzgerald
![]()
![]()
![]()
![]()
![]()
![]()
![]()

Information provided on BOS is for educational purposes only. The products and services we review may not be right for your individual circumstances.
We adhere to strict editorial guidelines. Rest assured, the opinions expressed have not been provided, reviewed, or otherwise endorsed by our partners – they are unbiased, independent, and the author’s alone. Our licensed experts fact-check all content for accuracy. It is accurate as of the date posted and to the best of our knowledge.