Reverse Osmosis Water Filter System Diagram | Flow Process
Written by: Alexandra Uta // Last Updated: Aug 15, 2023
This page may contain affiliate links. If you buy a product or service through such a link we earn a commission at no extra cost to you. Learn more.
Reverse osmosis by itself is not a very complicated process, but putting it into a home water filtration system that operates over a long period of time is a different story.
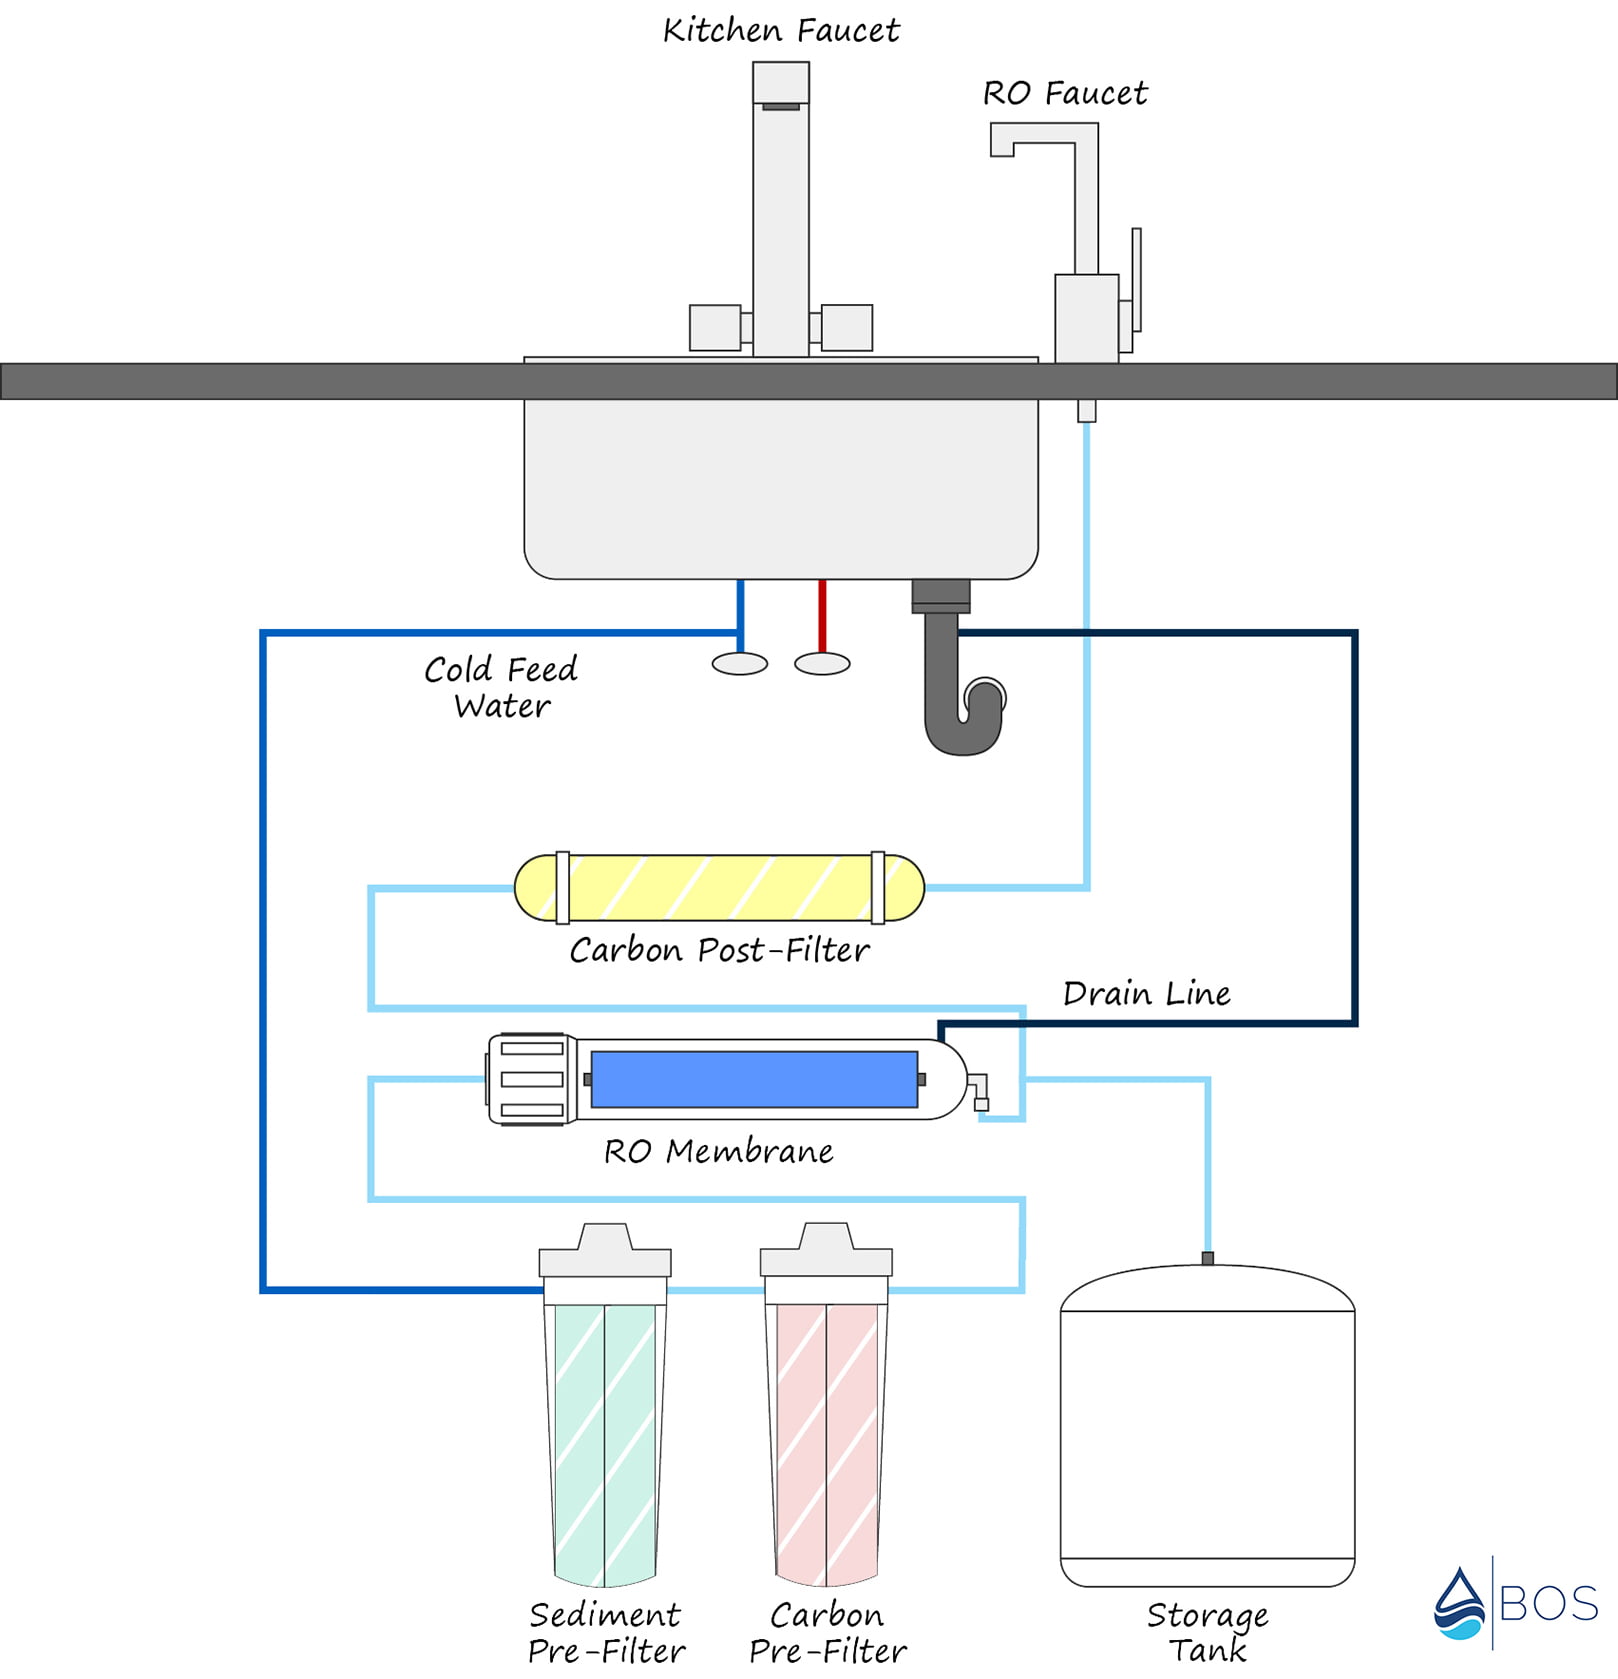
Here is a reverse osmosis system diagram outlining how such a system operates when installed under a kitchen sink.
Contents
show
Reverse Osmosis System Diagram
Here is our reverse osmosis system diagram. It shows an under sink RO water filter with 2 pre-filter stages, the reverse osmosis membrane, a carbon post-filter, a water storage tank, and the RO faucet.
Reverse Osmosis System Components
The typical reverse osmosis system is organized into multiple components interacting with each other. What we have outlined below is the typical configuration you will find in most systems for home use. Keep in mind that your situation might be slightly different.
System Module
The main module of the system is the hub, which connects all of its components into one location. It’s a large plastic case with ports for input and output as well as threads for screwing.
Pre-Filter Stages
One or several pre-filtration stages might be used to purify water before it reaches the reverse osmosis membrane. This is necessary to ensure the optimal operation of the reverse osmosis system by removing debris which could clog the membrane. In most cases you will find a sediment pre-filter and a carbon pre-filter at this stage.
RO Membrane
The membrane is where all the magic happens. It’s a thin semipermeable membrane with pores that are so small that only water molecules can pass through them.
Post-Filter
The post filter is the final filtration stage after water has passed through the reverse osmosis membrane. It’s used to further purify the water and remove any leftover contaminants that might not have been caught by the other stages.
RO Storage Tank
You need a storage tank to hold the filtered water if you want to always have access to it on demand. Otherwise you would have to wait a long time for the reverse osmosis process to do its job. The tank should be large enough to store enough water for your daily use, but also not too large to prevent water from becoming stale.
Dedicated Faucet
You should have a dedicated faucet for dispensing water from your reverse osmosis system. This would typically go on your countertop next to your regular faucets.
Drain Connection
The drain connection is used to dispose of wastewater.
Feed Water Valve
The feed water valve is used to hook up the system to your water supply.
ASO Valve
An automatic shutoff valve prevents the system from working all the time when it’s full. It’s triggered by the tank when it’s at capacity.
Check Valve
The check valve prevents water from flowing back into the reverse osmosis membrane.
Flow Restrictor
A flow restrictor restricts wastewater making its way through the drain line, and ensures that pressure is kept at sufficiently high levels to allow the system to work correctly.
Tubing
Various components of the system are connected with the use of tubing.
Fittings
You will see various fittings used to connect the tubing to your reverse osmosis system components. Many manufacturers color code their fittings to make them easy to hook up.
Where to Install
It’s important to install the reverse osmosis system in an appropriate place to ensure its optimal operation. Here are some things to consider in this regard.
Reverse Osmosis System Module
It doesn’t really matter where you install the reverse osmosis system module as long as it has no opportunity to freeze. Most people install them under the sink directly, but if you don’t have enough space there, you can easily put it into a separate cabinet.
Water Tank
You should ensure that the storage tank is no farther than 10 feet away from the RO faucet. The storage tank is pretty flexible in the way you can set it up and you can easily lay it on its side.
RO Faucet
You should always install the reverse osmosis faucet on a flat surface. There should be plenty of area available on your countertop.

Drain Saddle
Always install the drain saddle above the P-trap. Make sure it’s far away from the garbage disposal or dishwasher lines to avoid clogging issues.
How to Install
If you want to install your reverse osmosis system yourself, this is perfectly possible as long as you have the right tools and take some time to prepare.
Tools and Supplies You‘ll Need
- Variable speed electric drill capable of drilling through your countertop or sink material
- Drill bits
- Screwdriver
- Adjustable wrench
- Plastic tubing cutter
- Teflon tape
- Hammer
Installation Instructions
- Start by drilling a hole into your countertop to install the faucet into.
- Hook up the drain saddle on the sink drain line, keeping it far away from the dishwasher and garbage disposal lines.
- Shut off the water supply under your sink. Open the kitchen faucet. Install the feed valve and reconnect the existing tubing.
- Put the RO system module in position.
- Hook up the storage tank by wrapping its threaded port with Teflon tape and screwing on the connector.
- Connect the various tubing to the feed water valve, tank valve, and other components, following the color coding.
- Install all filter cartridges and the membrane.
- Turn on the feed water valve and verify that there are no leaks.
- Let the system flush properly.
- Close the RO faucet and open the valve for the storage tank.
- Fill up the tank and drain it, then repeat.
Further Reading:
How Does a Reverse Osmosis System Work and What Does It Remove?
Mechanically speaking, a reverse osmosis system is pretty simple. It uses a thin semipermeable membrane to separate water from contaminants. Water is pushed through the membrane at a high level of pressure and only water molecules are able to pass through it. Everything else gets rejected and sent away.
Reverse osmosis systems come in many configurations, including multi-stage filtration setups that effectively remove many types of contaminants. Here are some examples.
3-Stage Reverse Osmosis Systems
In a three-stage reverse osmosis system you would typically have a carbon pre-filtration step, reverse osmosis, and then carbon post-filtration. This is a pretty simple setup, but it gets rid of most types of contaminants effectively. The carbon pre-filters protects the RO membrane from chlorine damage.
4-Stage Reverse Osmosis Systems
Four stage reverse osmosis systems usually add a sediment pre-filter to additionally treat water before it reaches the reverse osmosis membrane. This protects the latter from clogging. Everything else is usually the same as in a three-stage system.
5-Stage Reverse Osmosis Systems
In a five-stage reverse osmosis system, you often add a remineralizer as a final step. This is useful when you want to maintain the benefit of enjoying all the minerals naturally contained in your water. In some cases, instead of a remineralizer post-filter, an extra carbon pre-filter is added instead. Other models may use a UV disinfection stage.
If you have any questions about our RO system diagram please don’t hesitate to leave a comment below!
About the Author Alexandra Uta
![]()
![]()
![]()

Information provided on BOS is for educational purposes only. The products and services we review may not be right for your individual circumstances.
We adhere to strict editorial guidelines. Rest assured, the opinions expressed have not been provided, reviewed, or otherwise endorsed by our partners – they are unbiased, independent, and the author’s alone. Our licensed experts fact-check all content for accuracy. It is accurate as of the date posted and to the best of our knowledge.