This page may contain affiliate links. If you buy a product or service through such a link we earn a commission at no extra cost to you. Learn more.
Occasionally cleaning or rather sanitizing a reverse osmosis system guarantees optimum performance. It rules out scaling and fouling for the highest water quality and flow. Plus, you are protected from potentially harmful pathogens.
How to sanitize an RO system properly? Don’t worry, you can easily do this yourself without calling for a professional. Find everything you need to know in our guide below.
Turn off the water supply and depressurize the system.
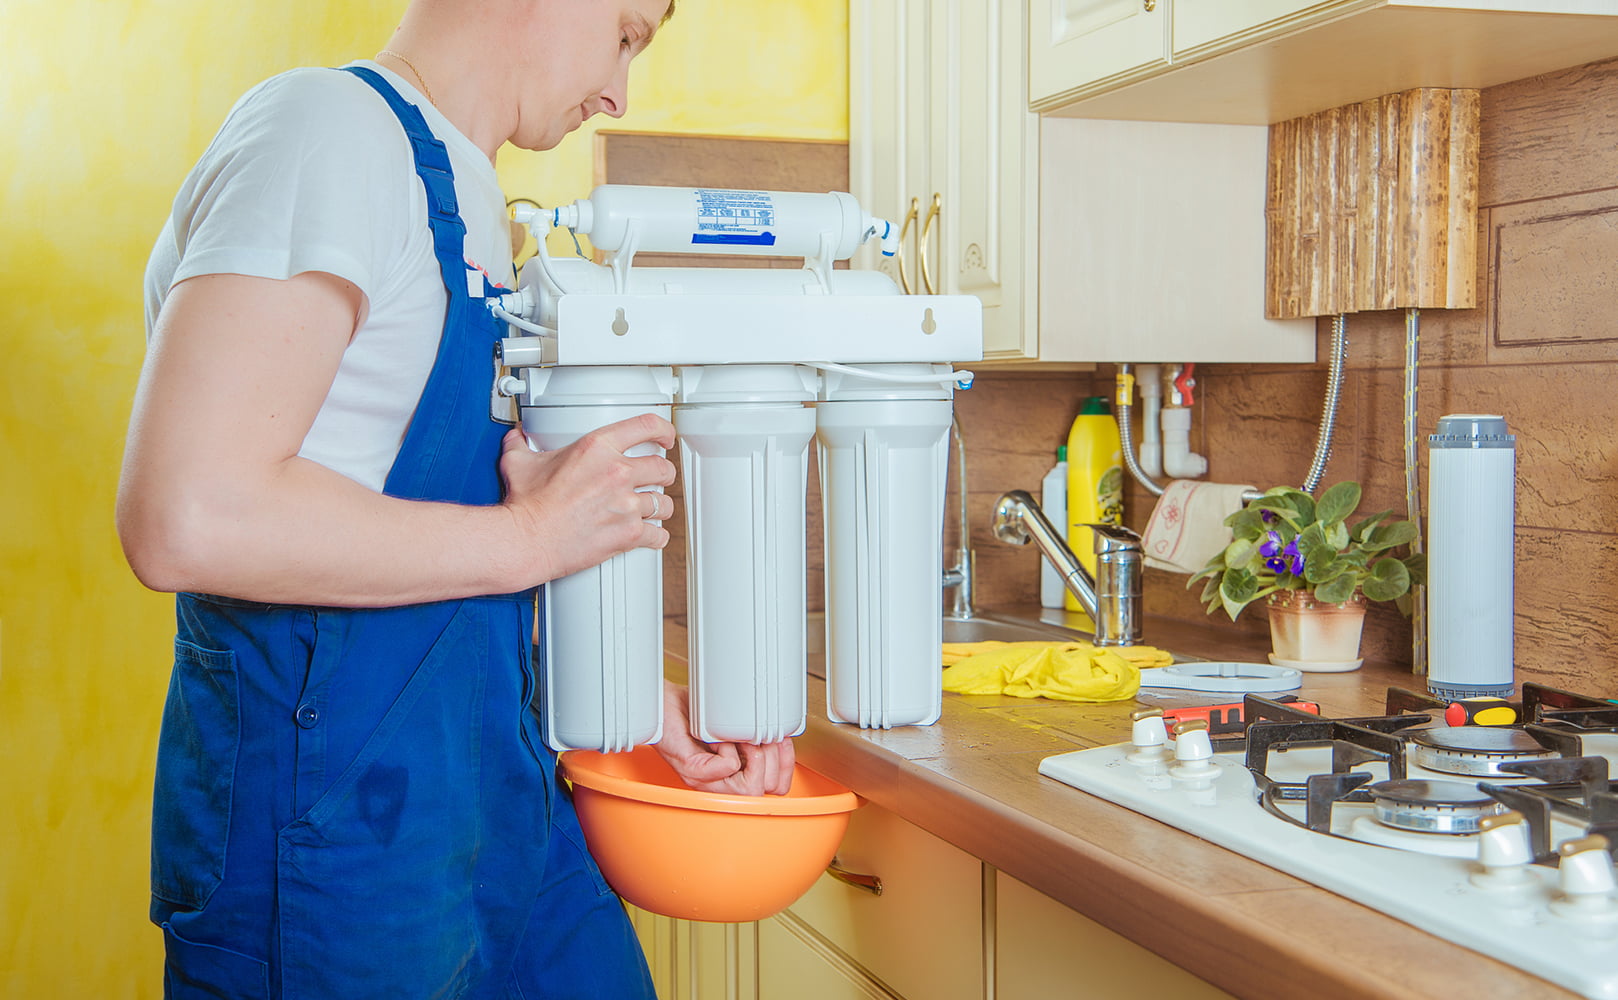
Remove ALL pre-filters as well as the RO membrane from their housings
Scrub the inside of the housings with dishwater and rinse thoroughly.
Add bleach into the housing of filter stage 1.
Install all empty housings and turn on the water supply.
Open the RO faucet until water comes out.
Let the storage tank fill and allow the bleach to stay in the system between 30 mins to a couple of hours.
Flush the entire RO system.
Refill the tank for a second time and flush it out again. (Repeat if necessary until all sanitizer scent has vanished.)
Turn off the water supply again and depressurize the system.
Install the filter elements.
Turn the water back on and allow the system to flush for a couple of minutes.
Check for leaks.
Let the tank fill, then discard the water. You should discard 1 or 2 full tanks of water before use.
Disinfection: How to Sanitize a Reverse Osmosis System
First of all, cleaning and especially sanitizing a reverse osmosis system is not necessary per se. If your feed water is already in decent condition you might get away without it.
Still, we recommend you follow through with it as the process is pretty straightforward and doesn’t require much of your time. And this way you are on the safe side, not only protected from potentially harmful microorganisms and the like, but also knowing that scaling and fouling won’t affect output water flow and overall quality.
How often to clean/sanitize? Ideally once a year, maybe twice if need be. What’s most important is that you do this regularly to prevent irreversible damage. In our opinion, the perfect time for cleaning is when you change one or more of the filter elements (including the RO membrane).
In this case, here is how the process goes:
For specific instructions please consult the manual. Also, note that the post-filter will need replacement after this, unless you bypass it.
Start by washing your hands.
Prepare a bucket of warm dishwater. You should also have a scouring pad or brush at the ready. In addition, you will require about a quarter cup (3 tablespoons) of unscented household bleach, hydrogen peroxide or chlorine for disinfection – any NSF approved sanitizer should work, too.
Turn off the water supply to the unit. You don’t want to flood your kitchen.
Disconnect any ice makers, refrigerators, etc.
Open the filtered water dispenser to depressurize the system. Wait until the flow stops.
Remove ALL pre-filters as well as the RO membrane from their housings.
Scrub the inside of the housings with the dishwater. Rinse thoroughly afterwards.
Add the bleach into the housing of filter stage one.
Double-check that the black rubber O-rings are in place and screw all empty housings back on.
There should be no filters except for the post-filter installed at this point. If so, turn on the water supply.
Open the RO faucet until water comes out. Then close it.
Check for leaks.
Let the storage tank fill and allow the bleach to stay in the system for between 30 minutes and up to a couple of hours.
Flush the entire system.
Let the tank refill a second time and flush out. All sanitizer scent should have vanished by now. If not, repeat the flushing cycle.
Turn off the water supply once more.
Depressurize the system by opening the faucet.
Now you can install any new filter elements and those old ones that are still in good shape. Again, make sure that the rubber O-rings sight tight to prevent any leaks. Remember to also replace the polishing filter.
Turn the water supply back on.
Open the RO faucet and let the system flush for a couple of minutes.
Check for leaks.
Close the faucet to let the tank fill.
You should discard 1 or 2 full tanks of water before use, although this might not be necessary depending on your system (refer to manufacturer instructions).
Finally, you can reconnect your ice maker or refrigerator.
The whole sanitizing thing didn’t quite turn out as you had hoped? Maybe it’s time for a new system. Check out our top 10 RO systems if you like.
Cleaning the RO Membrane
While you wait for the bleach to do its thing you could free the semipermeable reverse osmosis membrane from dirt (unless you are planning to replace it anyway).
In order to clean an RO membrane you need to soak it in different chemical solutions – remember to follow instructions regarding safe handling and disposal – depending on its type and as recommended by the manufacturer.
This will help you to get rid of organic matter, calcium precipitates, mold, mildew and other nasty stuff which, in turn, prevents scaling and fouling.
Step-By-Step Cleaning Instructions
For detailed step-by-step instructions check out our article on RO membrane cleaning (link to be added soon). Basically, you need to:
First, put on gloves and protective eye wear.
Prepare the cleaning solutions in non-reactive plastic buckets.
Close the water supply + tank valve and depressurize the system.
Take the RO membrane out of its housing.
Soak the membrane in each of the chemical solutions for the recommended time. Rinse thoroughly after each bath.
Put the system back together.
Flush the entire system for 20 to 30 minutes before using the water.
How to Clean a Reverse Osmosis Tank
If you follow the procedure above which explains how to sanitize an entire RO system then there is no need for you to clean the storage tank separately as this has already been taken care of.
However, you might have noticed a strange taste in your water or a funny smell and you assume the tank to be the culprit. Then cleaning the storage tank alone can make sense. Here’s how:
The post-filter will need replacement after this, unless you bypass it.
Shut off the feed water supply.
Open the RO faucet to depressurize the system. Wait until the flow stops.
Close the tank valve and disconnect the tank tube from the rest of the system (leave the tube attached to the tank).
Drain any water that’s still inside the tube.
Use a funnel or eyedropper to add unscented household bleach into the tube. Half a tablespoon should be more than enough. Hydrogen peroxide, chlorine or any NSF approved sanitizers are fine, too.
Reconnect the tubing without the sanitizer leaking out.
Open the tank valve and make sure that the RO dispenser is closed.
Turn on the feed water supply.
Check for leaks.
Let the tank fill. The bleach will kill any pathogens inside. Allow the bleach solution to sit for 30 minutes up to a couple of hours.
Lastly, open the RO faucet to drain the tank. Let it refill and drain again. All sanitizer scent should have vanished by now. If not, repeat the flushing cycle.
Why Do I Need to Clean/Sanitize My Reverse Osmosis System?
So why do need to clean and sanitize your reverse osmosis system anyways?
While it might seem counterintuitive, water filtration systems can become magnets for contaminant buildup.
Reverse osmosis systems are susceptible to developing slime and biofilm over time if they aren’t cleaned. The storage tank is particularly vulnerable to this, so it must be sanitized periodically to prevent contamination.
Regular system cleaning will not only wipe out any biofilm and organic contaminants, but it will also reduce the chances of performance problems and ensure your drinking water quality is at optimal levels.
There is no hard number for how often you need to clean/sanitize a reverse osmosis system, but generally speaking, RO systems should be cleaned 1-2 times per year. An easy way to remember to do this is to conduct the cleaning process when you change the pre and post-filters.
Of course, the exact frequency of cleaning will depend on your feed water quality. Water with higher levels of contaminant particles will be harder on the system, which means you’ll need to clean/sanitize more frequently. Also, the more water you use, the more dirt runs through your reverse osmosis system.
How to Know When Your RO Unit Needs Cleaning
If you start noticing obvious signs like unpleasant odors coming from your system then that should be a clear sign that something is off. A visual inspection of the RO system filters and housings resulting in finding dirt buildup can also give you a clue that the system is in need of cleaning.
Generally speaking, there won’t be any obvious signs letting you know that your RO system needs cleaning. This is why cleaning/sanitizing the system – especially the RO storage tank – should be completed according to the manufacturer’s recommendations.
If you have any questions about how to clean a reverse osmosis system please don’t hesitate to leave a comment below!
About the Author Gene Fitzgerald
Gene Fitzgerald is one of the founders of BOS and currently head of content creation. She has 8+ years of experience as a water treatment specialist under her belt making her our senior scientist. Outside of BOS, Gene loves reading books on philosophy & social issues, making music, and hiking.
Learn more about Gene and the rest of the BOS Team.
Information provided on BOS is for educational purposes only. The products and services we review may not be right for your individual circumstances.
We adhere to strict editorial guidelines. Rest assured, the opinions expressed have not been provided, reviewed, or otherwise endorsed by our partners – they are unbiased, independent, and the author’s alone. Our licensed experts fact-check all content for accuracy. It is accurate as of the date posted and to the best of our knowledge.
Leave a Comment:
Rico Cabilao says
March 18, 2020
Do i necessarily need to removed ro membrane when sanitizing my RO?
Thanks!
Could you please tell me what you mean by “RO dispenser” from Step #7 of How to Clean a Reverse Osmosis Tank? In step #11 you refer to the “RO faucet”. Is the “RO dispenser” the same as the “RO faucet”?
Thanks Much,
Vinnie